The Upload control has undergone major revisions in the last few releases. This was mainly due to Google/Chrome killing support for Flash combined with improvements in HTML5 and PCSOFT’s use of HTML5. But somewhere along the way, we lost the simpler “I just need to upload a file” control and only have a more complex multifile upload available now. Today we are going to explore how to get that back.
Let’s start with what is “in the box”. If you drop down the button option on the Creation tab, you will find File upload.
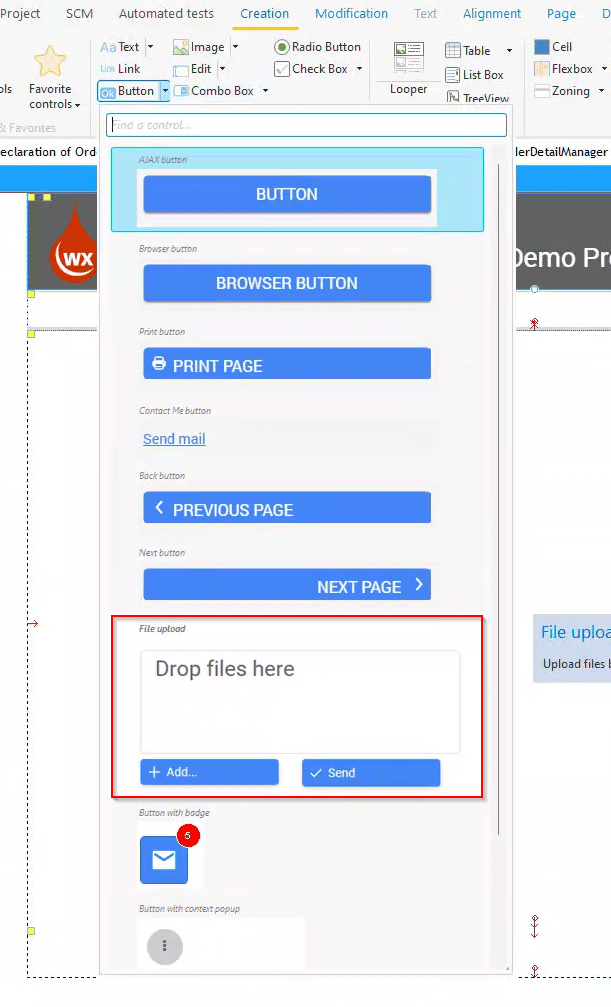
And if we drop that on our page we actually get 2 buttons, a cell, a static, and a looper with several controls on it. There is also a lot of code behind those controls. This is great if we want the ability for the users to either use the add button or drag and drop to add several files to a list (the looper) and then when all are done press the send button to upload them all.
But what if we just want a simple, click here to upload a single file function? We have a couple of options
Upload Edit Control
Something that looks more like this:

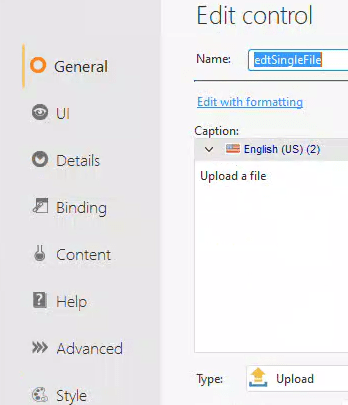
We start by adding an edit control to the page, then on the General tab of the description we change the type to Upload, which is what gives us the “Choose a file” button. Don’t ask me about the styling of this button, It seems to be affected by the style of the input area settings of the style, but we don’t seem to have a lot of control of the style or the text displayed on the button. It mentions this on the help page located at https://doc.windev.com/en-US/?3012024&name=uploading_files
This changes the edit control into browser-only control. This is a key concept to understand with this control. It only captures the name of the file in the browser. It doesn’t do anything else with it, and we can not directly use the value of the control to get the filename either. Due to the nature of the Browser/Server security model, the name won’t be available to us on the server.
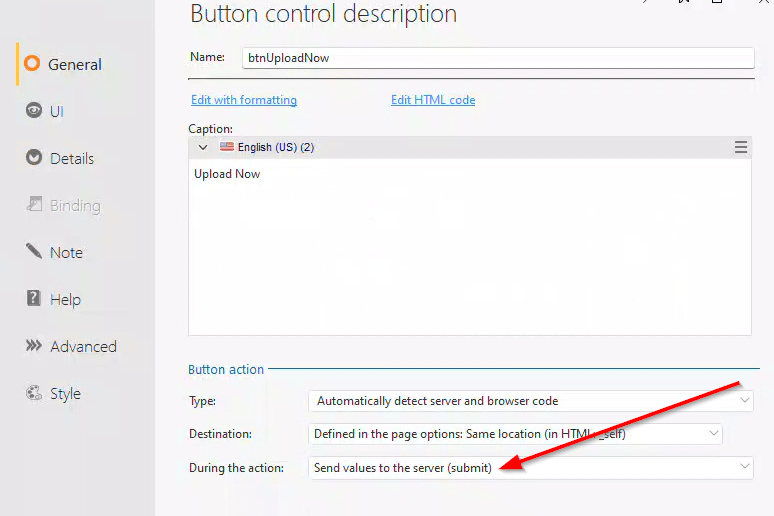
Instead, we need another button, which is a server submit button. This could either be your normal “Save” button if you are doing this as part of a Form, or it would be a separate “Upload Now” button.
When that button is pressed, the file selected is uploaded to the server and place in a temporary folder. We have a couple of special functions to deal with the file
UploadFileName – This provides us the name of the file uploaded. It takes 2 parameters, the name of the upload edit control, and a boolean.
If the boolean is set to True it returns the name of the file on the server, which is a temporary file name that was assigned during the upload. Unless you are going to do some manual manipulation of the file instead of using UploadCopyFile, which is the next function we are going to discuss.
If the boolean is set to False then you get the filename as it was on the browsers machine. This is helpful for you if want to keep track of the actual filename etc.
UploadCopyFile – This copies the file from its temporary location to a directory on the server. It takes 3 parameters (technically 4 but we won’t be using the 4th since we are dealing with single files). The first parameter is once again the name of the upload edit control. The second is the name of the server folder where you want the file placed.
The 3rd parameter is the new name you want to give the file, if you set this to an empty string it will use the same filename as the file was on the browser’s machine. If you give a name without an extension it will use the new name, but the same extensions as the one on the browser’s machine. And finally, if you give it both a full name with extension then that will be the new name of the file.
The function returns a string which is the resulting name of the file, just the file and extension, not the path. If the copy failed this will be an empty string.
So you have a few options on how you code your logic.
You could test the Browser Filename using UploadFileName(ControlName,False) and if that is blank then there was no file uploaded so you would not execute the UploadCopyFile command or any of your other logic to deal with the file.
You could test the Server Filename using UploadFileName(ControlName,True) and again it will be blank if no file was sent. But this also gives you the full filename of the temporary file that is now on the server in case you want to manually manipulate that file instead of using the UploadCopyFile command.
Or you could just test the results of the UploadCopyFile(ControlName,ServerDirectory,””) command and if it is blank then you didn’t get a file. The only downside to doing this is the file may have been uploaded and for some other reason the UploadCopyFile failed which would still result in a blank result and you would have no way of knowing this condition.
So in quick review. I added an edit control to the page, I set its type to Upload. I added another button that is both Submit and not AJAX, and on that button, I have the following code.
ServerDirectory is string = "C:\temp\upload"

ServerFileName is string = UploadFileName(edtSingleFile,True)
BrowserFileName is string = UploadFileName(edtSingleFile,False)

retFileName is string = UploadCopyFile(edtSingleFile,ServerDirectory,"")

Info(ServerFileName,BrowserFileName,retFileName)
And the results I get from the info function are:

So ServerFileName as you can see is a completely random temporary filename, the BrowserFileName is the name of the file on the browser’s machine, with no path information since we don’t have access to that path anyway. And the results of the UploadCopyFile is the same file name because I passed an empty string as the 3rd parameter.
NOTE: The help page doesn’t mention this but apparently the upload doesn’t happen unless AJAX is turned off for the button!
Upload Control
This is the PCSOFT recommended method. In fact, on the help page for this control https://doc.windev.com/en-US/?1016330&name=the_upload_control, they mention that the Upload Edit Control is only kept for backward compatibility.
This is the style I normally use. It is fully HTML5 compatible, since v22, and it is asynchronous by default. My only complaint is we used to have an option to populate this as a single or multiple file upload. But we only have the option for the multiple file upload now.
Everything still works fine, it is just a bit of a PITA to change it around to be for a single file.
As mentioned above when you drop the multiple file upload control you get several controls. The “Add” button is actually the upload control and all the other controls are just supporting characters 🙂 But I can’t find a way to drop just the upload control onto a page anymore. You have to drop the multiple file upload control and then pair it down to just what you want.
So I drop a multiple file upload control on my page, and then I delete everything except the “Add” button, which as mentioned is the real upload control. In reality, I copy this from one of my existing pages, but you got to do it that first time, right :-). I change the caption to something that makes sense for the page and the fact that this will immediately upload the file

In the UI tab of the button description I turn off the Multifile selection and the drag and drop options

Next, I create a single progress bar (progUpload). I set the progress bar to be invisible by default and I set the upper bounds to 1000, instead of the normal 100 so we have more granularity with smaller files.

Then it is on to the code. There is already a lot of code behind the Upload control, but most of it we aren’t going to use.
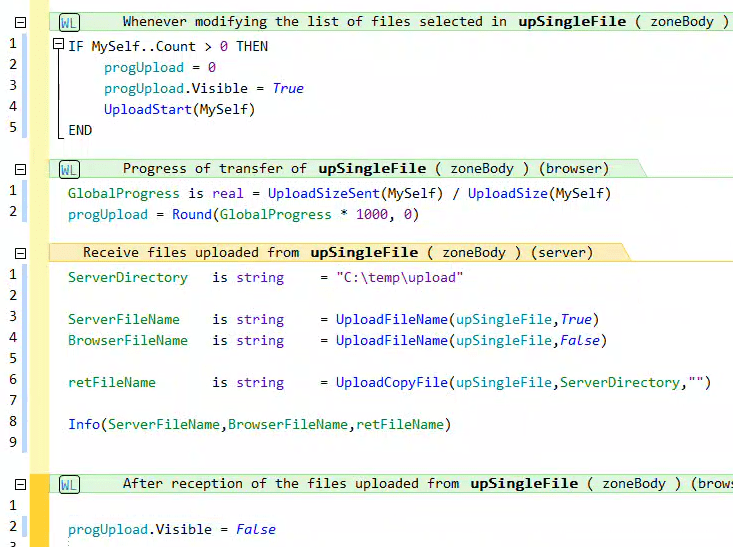
First in the browser event “Whenever modifying the list of files selected” we add this code
IF MySelf..Count > 0 THEN
	progUpload = 0
	progUpload.Visible = True
	UploadStart(MySelf)
END
When they press the button, it opens a file picker if they select a file then MySelf..Count will be 1, if they cancel it will be 0 and we won’t do anything.
If they select a file to upload then we reset our progress bar, make it visible, and start the upload process.
In the browser event “Progress of transfer” we add this code
GlobalProgress is real = UploadSizeSent(MySelf) / UploadSize(MySelf)
progUpload = Round(GlobalProgress * 1000, 0)
This code simply updates the progress bar as the file is uploaded
In the server event “Recieve Files uploaded” we put our code to deal with the actual uploaded file. For this demonstration we can use the exact same code as we did for Upload Edit Control
ServerDirectory is string = "C:\temp\upload"
ServerFileName is string = UploadFileName(upSingleFile,True)
BrowserFileName is string = UploadFileName(upSingleFile,False)
retFileName is string = UploadCopyFile(upSingleFile,ServerDirectory,"")
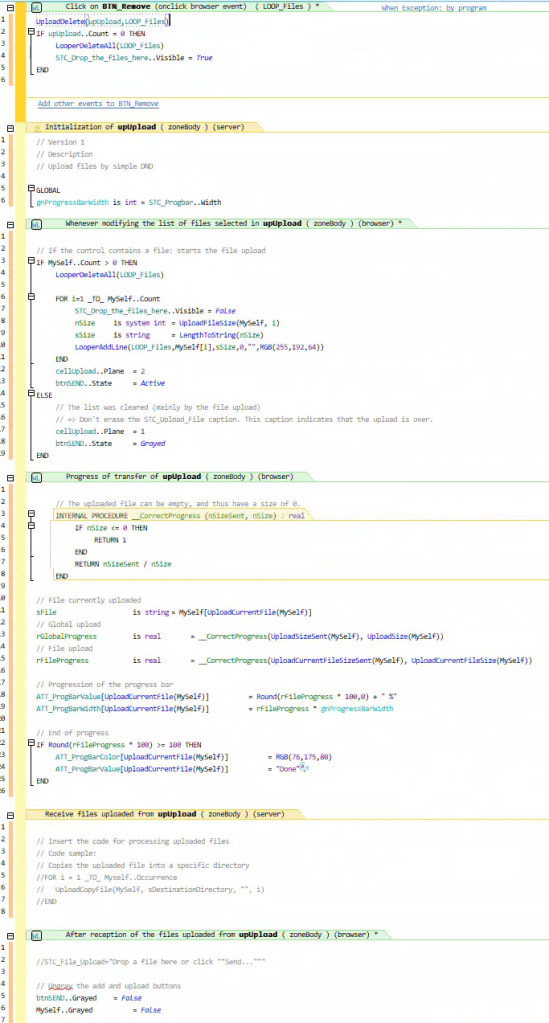
Info(ServerFileName,BrowserFileName,retFileName)And finally in the browser event “After reception of the files uploaded” we place this code which rehides the progress bar.
progUpload.Visible = FalseBut it all together and this is what all the code looks like
At runtime the user sees our button. When they press it they see the standard Windows file picker.
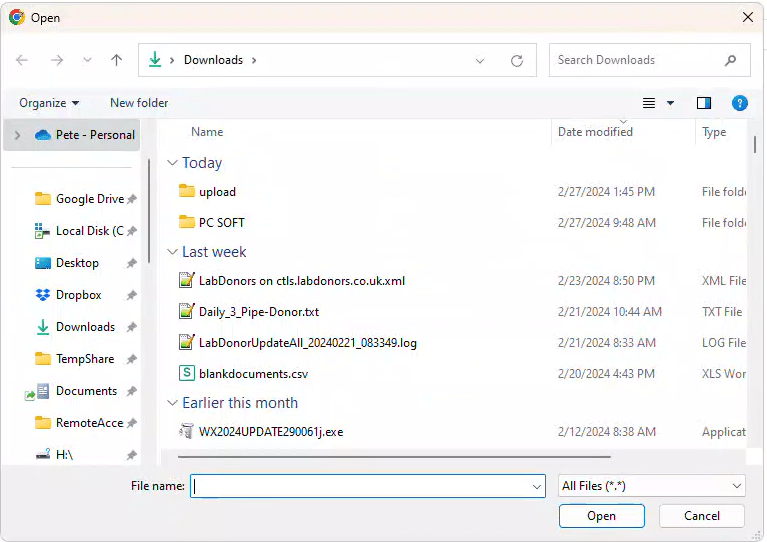
Once they select a file it is uploaded. With the progress bar showing the status of the upload, and when the file is uploaded our same server code executes as it did with the Upload Edit Control example with the exact same results.
Notes / Bonus Material
Be sure to note the section concerning maximum file size on the help page at https://doc.windev.com/en-US/?3012024&name=uploading_files, this may affect you.
Also, be sure to read this blog article which discusses an issue with trying to test file upload locally with the new IIS express setup PCSOFT does by default on our development machines
This example is included in our wxDemo project as a page named Upload. You can download it via this dropbox link https://www.dropbox.com/scl/fi/09usl9nfc6d0sp8psknbe/wxDemo_v2024.ZIP?rlkey=3jcmratbdyoqirsrcop63v91c&dl=0
