
Predictive Input, Type Ahead Lookup, or whatever you want to call it, it is one of the holy grails of a good User experience. Over the years I have used several approaches to achieve it. Today we will look at using the Assisted Input functions of WL along with the wxFileManager. BTW, There is also some bonus coverage of the new AJAX features of version 2024 in the WEBDEV example.
Assisted Input is backed into WL, you can read all about the basics on this help page https://doc.windev.com/en-US/?1000021089. It even has a way to do it all automatically if your edit control is bound to a query. But that doesn’t give me the control I desire. So let’s look at how I use it along with wxFileManager
For I create an edit control. Nothing special about it at all, just a normal edit control. Don’t turn on the Assisted Input on the Detail tab of the description because we will be managing everything ourselves.

In the Initialization Event of the control, we put the following code:
MySelf.ConfigureAssistedInput(aiFilter,filterContains)
MySelf.ConfigureAssistedInput(aiWidthListBox,MySelf.Width*2)
MySelf.ConfigureAssistedInput(aiNoCase,True)
MySelf.DeleteAllAssistedInput()

GLOBAL
ValueSelected is boolean
savValue is string
mgrProduct is ProductManager
mgrProduct.FetchData()
FOR EACH recProduct OF mgrProduct.arrRec
	MySelf.AddAssistedInput(recProduct.CodeAndDescription,recProduct.ProductID)
END
Note: In this example, I am preloading the possible values when the edit control is initialized. There is a more advanced method that allows you to refilter the results as the user types, which would be more appropriate if you have thousands of records to select from, we might cover that in a feature post if there is enough interest.
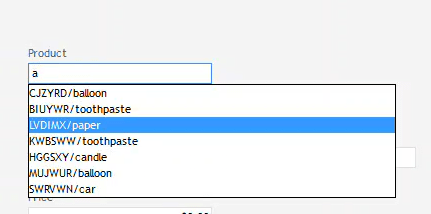
The first 4 lines are configuring how the assisted input works. We set the filtering behavior to Contains instead of Starts With, which is the default. When the Assisted Input list is shown we make it twice as wide as the edit control, since we are showing both the Product Code and the Description in the list. We set the filtering to not be case sensitive. And finally, we remove any existing values that have been loaded for the Assisted Input, we really don’t need to do that the way we are coding it here, but what can I say I am that guy who wears a belt with my suspenders.
The rest of the code follows a GLOBAL keyword. I do this so that the declared values are available in the other events of the control. Learn more about this trick in this post from earlier today: https://blog.wxperts.com/2024/03/10/global-keyword-in-a-controls-init-event/.
I declare two variables (ValueSelected, savValue), we will see how they are used shortly. The next two lines declare an instance of our wxFileManager for the Product database table and load it will all of the records. The mgrProduct is also used in the SelectAssistedInput procedure, which is why it is in this GLOBAL section.
Bonus Tip: In a production application where there might be 100’s of places where there is a product lookup, we would declare the manager global to the application and load it once instead of loading it with each control like this example.
The magic of Assisted Input happens in the code calling AddAssistedInput. We call it for every record of the Product table. It takes 2 parameters, the first is the valves we want to display in the list. I am using a property in the Product record class, to combine both the product code and the description, so if the user knows the product code they will be able to type that to locate the record, other wises they can type in a portion of the description to locate the record. This property along with the Contains filter setting makes it a very powerful and user friendly search.

The second parameter is the stored value of the list, think of it similar to the gLink feature of combo controls. I store the ProductID in this field. You will see how we use that when we look at the SelectAssistedInput procedure.
At this point, we already have a functioning Assisted Input on our edit control. However if we were to select an entry from the list, all it would do is fill in the displayed value in the edit control, which isn’t very useful for our example
So lets add some code to process the selected value from the control. First when you look at the code from the control, you will notice the link “Add other events to edtLookupProduct”

Clicking that we see that there are several additional Events for the control that are not normally shown in the code editor, the one we are interested in is the “Select a value in the list of input suggestions”

Turning on the checkbox and completing the screen adds the Event along with a definition for the procedure SelectAssistedInput

Notice the procedure accepts one parameter, which is an AssistedInput variable. When the user selects a value from the list this procedure will be called with the values of that entry. There are 2 elements in the Assisted input variable, caption and storedvalue, which correspond to the two parameters that we passed to AddAssistedInput. You can read more about the AssistedInput variable on this help page https://doc.windev.com/en-US/?1410088983
We just need to add code to the procedure to process the selection, like so:
PROCEDURE SelectAssistedInput(MySelection is AssistedInput)

recProduct is Product = mgrProduct.FetchRecord(MySelection.StoredValue,False)
edtProductID = recProduct.ProductID
edtProductPrice = recProduct.Price
edtProductDescription = recProduct.ProductDescription
edtLookupProduct = recProduct.ProductCode
ValueSelected = True
The first line declares an instance of our record class for Product and populates it. FetchRecord is a method of the wxFileManager that retrieves the record from the array already loaded by the FetchData, and the second parameter determines if we want to refresh the value from the database. By passing False we locate and return the record directly from the array and there is no additional database activity so it performs very quickly.
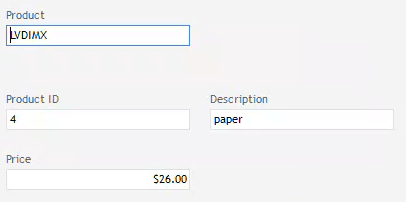
The next four lines just populated some additional controls on the screen. Notice this includes the actual edit control we are working on (edtLookupProduct), otherwise, it would have the value displayed in the list which is both product code and description, instead of filling it with Product Code since description has its own control.
The final line sets VauleSelected to true, we will see the reason for that shortly. Now when the user selects a value from the list, the other fields are filled in, and the edit control changes to only having the Product code in it.
The only remaining issue we need to deal with now is if the user cancels the Assisted Input without selecting a value. As the code currently stand, if the user were to type b, then hit the escape key when the Assisted Input list is displayed, then we would end up with just a b in the edit control, which of course would not be valid in this example, since we want a valid Product Code. So we add a bit more code to handle that.
First, in the “Entry in” Event, we save the current value into our savValue variable
savValue = MySelf.ValueThen on the Exit Event, if the user has modified the edit control but our ValueSelected variable is false then we know the user canceled the Assisted Input, so we restore the value back to our original value. Now you know why we set ValueSelected to True in the SelectedAssistedInput procedure
IF MySelf.Modified AND NOT ValueSelected THEN
	MySelf = savValue
END
Finally, in the “Whenever modifying” Event, we need to set the ValueSelected to False so whenever the user types in the control we know that they activated Assisted Input, and if they never make a selection it will be false so our Exit code will perform correctly.
ValueSelected = FalseNow we have an Assisted Input field that performs very well and provides the user with a great experience. Here is a screenshot of all the code of the edit control. That’s not a lot of code for the functionality we added is it!

WEBDEV Example
If at this point you are wondering if this all works with WEBDEV as well as WINDEV, well you should know Uncle Pete would never leave you hanging! There are a few things we need to do differently to do the same thing from WEBDEV.
First, We have to declare our mgrProduct instance of the wxFileManager class global to the page, instead of in the Initialization code of the edit control, this is of changes we need to make to the SelectAssistedInput procedure
Unfortunately, the aiWidthListBox option is not available for us to configure in WEBDEV, so our list will be the same width as the edit control.
One of the complaints I have often had about WEBDEV is that there are no Server Events for edit controls, anytime we need to execute server code from the edit control, we need to use ExecuteProcess to “press” a button that has server code on it, or use AJAXExecute to call a server procedure. This restriction bites us again here.
The SelectAssistedInput procedure becomes a browser procedure in WEBDEV. The issue with that is we can’t declare our record class in the browser code or access our wxFileManager class. We need to do that code in a server procedure so let’s create that:
PROCEDURE ProductSelected(inProductID)

recProduct is Product = mgrProduct.FetchRecord(inProductID,False)
edtProductID = recProduct.ProductID
edtProductPrice = recProduct.Price
edtProductDescription = recProduct.ProductDescription
edtLookupProduct = recProduct.ProductCode
We pass in the ProductID so we can look up the record and fill in our edit controls. We pass just the ProductID instead of the entire AssistedInput variable, because we can only pass simple variables between the browser and server. We also left the statement Setting ValueSelected over in the browser code, if we moved it into this procedure then it would need to be declared globally to the page instead of the edit control. Other than that this code is very similar to our original code from WINDEV
Note: In the dark days of WEBDEV before version 2024, we would have had to enable this procedure to be called via AJAX, however, that is now automatically detected and we don’t need to worry about it!
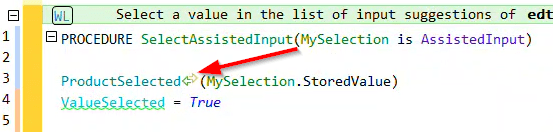
The only other change we need to make is in our SelectAssistedInput procedure of the edit control. As discussed it is now a browser procedure. We need to call the ProductSelect procedure we just created, and set the ValueSelected to true. Here is the code:
PROCEDURE SelectAssistedInput(MySelection is AssistedInput)

ProductSelected(MySelection.StoredValue)
ValueSelected = True
The observant among you may be thinking: “Wait a minute! You need to use AJAXEXECUTE to call that server procedure”. Again back in the dark days before version 2024 that would be true, but not WEBDEV automatically does that for us. In fact, as we type the procedure name, IntelliSense pops up and gives us two options for calling the procedure, the first would be a synchronous call and the second asynchronous.
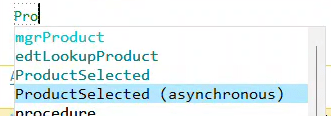
In this instance I want it to be synchronous so I select the first one. The resulting code has this special icon indicating that I am calling a server procedure from the browser.
Functionally this is the same as the old way of writing the statement which would have been:
AJAXExecute(ProductSelected,MySelection.StoredValue)These new AJAX features get even more interesting with the Asynchronous version. Before version 2024 we would have had to use the AJAXExecuteAsynchronous command and specify yet another browser procedure to execute once the server code was complete. Scattering our code into 3 locations (the browser event, a browser procedure for the return, and the server procedure.) Not exactly conducive to writing maintainable code.
Now with version 2024, if we select the Asynchronous version it writes the code like so:
AFTER ProductSelected(MySelection.StoredValue) DO

END
We are able to include any browser code that would have previously had to be included in that additional browser procedure, directly in the code, keeping our code together and more maintainable.
Sorry to geek out for a minute there but these new AJAX features are game changing for those of us that mainly do WEBDEV coding!
But back to our topic at hand. We the changes listed above our example works more or less the same in WEBDEV as it did in WINDEV. Here is a screenshot of all the code of the page.

Notice those green squiggles under ValueSelected and savValue. If we hover over those, it warns us that we are changing a server variable from the browser and that the server will not see the change unless we use <browser synchronized> but in our, example we are not using those variables in any server code so it is not an issue. In fact, we should declare those as browser variables since we only need them in the browser. We do that by adding the browser version of the Initialization Event via the “Add other events” link. And moving our declaration code there
GLOBAL
	ValueSelected is boolean
	savValue is string
Now the entire code of the page looks like this and we no longer have those pesky green squiggles 🙂

Our wxDemo project includes both the WINDEV and WEBDEV examples from this post, you can download the project via this link dropbox link https://www.dropbox.com/scl/fi/09usl9nfc6d0sp8psknbe/wxDemo_v2024.ZIP?rlkey=3jcmratbdyoqirsrcop63v91c&dl=0

One thought on “Assisted Input + wxFileManager = The predictive input you have been looking for?”