
Previously exclusive to native apps, advances in HTML5 and WEBDEV’s consistent improvements in supporting web standards now enable access to local hardware, location information, and much more. This development further blurs the distinction between “Web Application or Native Application.” Today, we will explore how to add the ability to scan a QR code from our WEBDEV site.
Like most of my articles that explore the cutting-edge capabilities of PCSOFT products, the initial research and development for this feature was sponsored by a client. If you find this information helpful, be sure to thank Brian Holmes of Basebridge.com Ltd.
The Requirements
The requirements for the project were:
- [ ] Display a page that has an edit control and a button titled “Scan QR code”
- [ ] Pressing the button, opens a popup, that contains the Camera / QR Scanner
- [ ] When a QR code is read
- [ ] The popup window is closed.
- [ ] The edit control is filled with the text from the QR code
- [ ] A new button is displayed that uses the information from the QR code. For example to launch a specific page of a site, lookup an inventory record, etc.
As you might already imagine, there are numerous potential applications for this technology. For instance, a desktop application could scan a QR code on a badge to grant user access. While it’s not the most secure method, there are many scenarios where ultra-secure 2FA logins aren’t necessary. Similarly, using this technology on a mobile-accessed website could create a quick and easy inventory system. I look forward to hearing about your implementations.
The JavaScript library that makes it all possible
The magic behind this is a JavaScript library available at https://github.com/mebjas/html5-qrcode. According to the site, the project was forked on April 15th, 2023 to https://github.com/scanapp-org/imagecodes. The author plans to completely rewrite it and add numerous enhancements. Regrettably, it seems that project is not yet in production.
On to the code!
The first step is to include the JavaScript library in our page. This is done by adding it to the page description in the HTML header section.
<pre class="wp-block-syntaxhighlighter-code"><a href="https://unpkg.com/html5-qrcode">https://unpkg.com/html5-qrcode</a>
</pre>

Note that in this example, I am loading it from an internet source. However, we could also add it to our project’s _WEB folder and include it from there.
I created a popup that has an html control (not html editor!) and a cancel button

In the HTML source code, I have created a DIV tag. This tag will be used to specify where the QR Scanner should appear.
<div id="reader" style="width: 500px; height: 500px;"></div>

In the Browser Global Declaration Event, we set up the JavaScript library.
scanParms is dynamic object = new "Object"
scanParms.fps = 10  // 10 Frames per Section
scanParms.qrbox = 250  // 250x250 used for QR Code rest of camera will be grayed

QRScanner is dynamic object
// Parm 1 = DIV id from our HTML object
// Parm 3 = Verbose Mode, if true it outputs info in the javaScript console for debugging
QRScanner = new object "Html5QrcodeScanner"("reader",scanParms,False)

- We create an object to set the parameters for the JavaScript Library call. This method of passing parameters is quite common in JavaScript.
- We set the Frames per Second (FPS) to 10, which determines how often the display is sampled. There are performance considerations for this setting, which you can learn more about on the linked site above.
- We set the QR box’s size in the camera display to 250×250. This is where the borders appear, indicating the area where the code is being read. The remaining camera area will appear gray.
- Next, we declare another object that will serve as an instance of the JavaScript Library.
- Next, we call the library function, passing it three parameters.
- This is the ID of the DIV we created in the HTML control.
- The Parameter object we just created.
- A Boolean set to false to disable the verbose feature of the library.
- I recently learned how to call a JavaScript function with parameters in WEBDEV. I used to struggle with getting the correct format to avoid compile errors. Often, I had to write the call as a JavaScript procedure instead of a WL procedure to make it work. I will discuss this in more detail in a future blog post.
The actual page has an edit control and 2 buttons.

The “Scan Code” button has the following onclick browser code
btnLanchPage..Visible =False
edtQR = ""
PopupDisplay(popScanner,popupCenter)
QRScanner.render(&onScanSuccess)
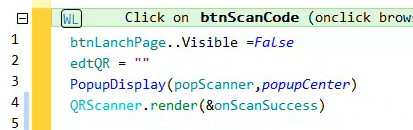
- We hide the “Launch Page” button and clear the edit control
- Open the Popup Page
- The render() method of the library is called to activate the scanner. This action starts the camera and triggers the permissions request.
- Take note of the & symbol before the procedure name. This is how we pass a procedure by reference to a JavaScript function, enabling it to call the procedure. I promise to discuss this in more detail in that future JavaScript blog post!
The “Launch Page” button is hidden by default. It only becomes visible after a QR code has been read.

At present, it merely displays a message containing the text from the QR code. This is where you would incorporate code to handle the QR code according to your specific use case.
Next, we need to create the ‘onScanSuccess’ browser procedure, which we referenced in the code behind the scan button. This procedure is invoked when the JavaScript library detects and decodes a QR code.

PROCEDURE onScanSuccess(decodedText, decodedResult)

edtQR = decodedText
QRScanner.clear()
btnLanchPage..Visible = True
PopupClose(popScanner)
- We set the edit control to display the decoded text from the QR Code.
- Note: ‘decodedResult’ is an object that contains additional information about the QR code. Depending on your specific needs, you may require some of this information.
- We use the clear() method from the library to stop scanning and clear the camera display.
- We display the “Launch Page” button
- And close the popup.
Finally, clicking the “Cancel” button on the popup simply stops the scanner and closes the popup.

QRScanner.clear()
PopupClose(popScanner)
Seeing it in Action
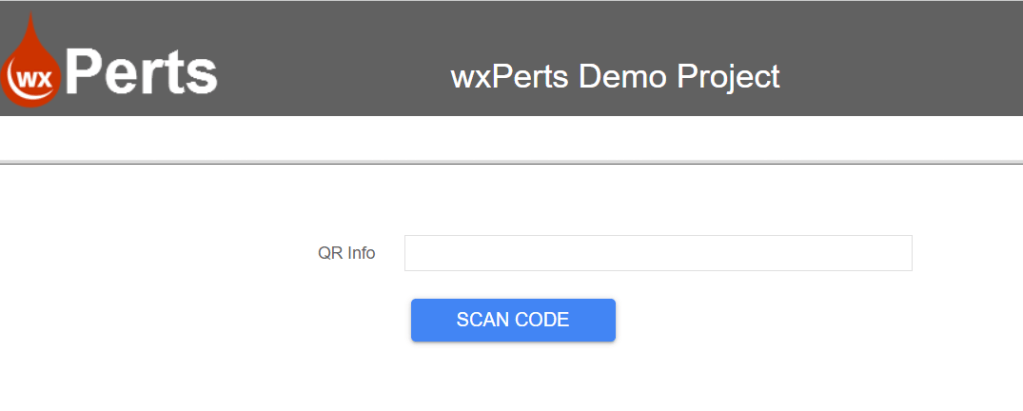
We begin with our “Best page ever” :-), featuring an edit field and a button labeled “Scan Code.”
When you press the scan code button, several things might occur. If this is your first time visiting the site or if you’ve recently reset your browser data, you’ll need to grant the site permission to access your camera. The screen will then look similar to this.

When you press the button, the browser will display a “Mother May I” prompt.
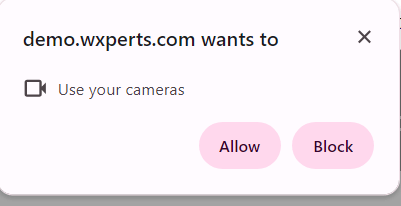
💡 Testing on localhost via the "GO" button should be straightforward. However, for this to work on a live site, you must have an SSL certificate and access the site via HTTPS. The ask permissions function will not operate without SSL, except on a local host, due to browser security measures. The entire web is pushing for all sites to use SSL, so there's little reason for your site not to have a certificate. If you need help with this, be sure to check out my relevant post. Let’s Encrypt + Certbot = SSL Free and Easy!
Once you grant permission, you will see the camera control. There’s also a combo box that lets you switch between cameras, which is useful on a mobile device with both front and back cameras.
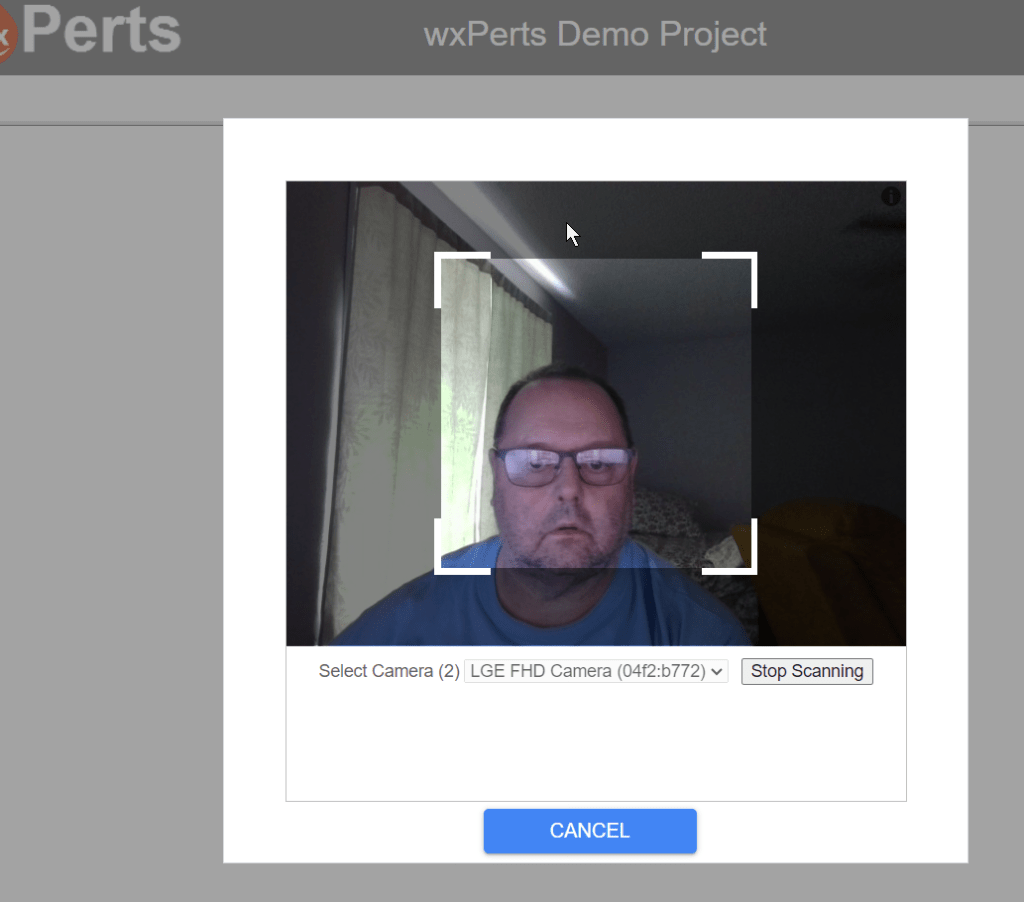
I cannot guarantee that the image staring back at you will be as attractive as this one.
Now, grab an item with a QR code and position it in front of the camera. For example, here’s the QR code on my Shokz OpenFit Ear Buds.
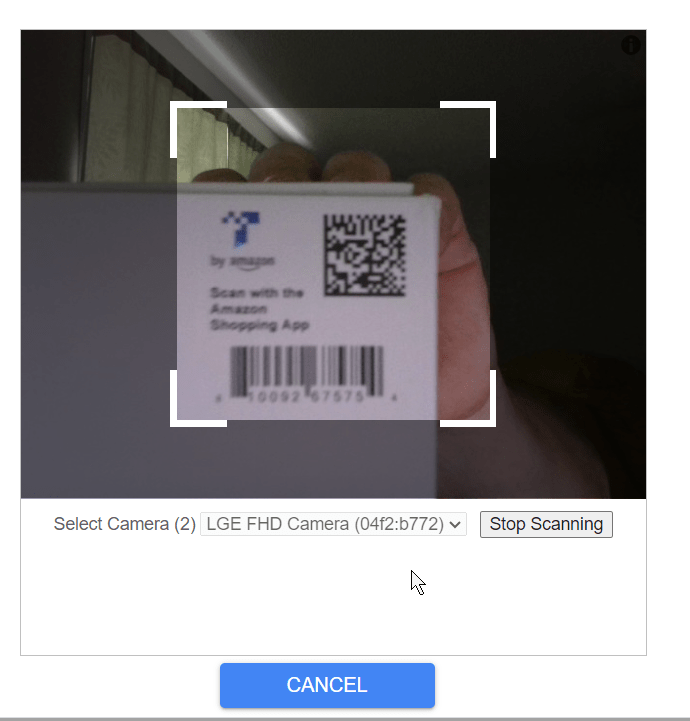
Once the QR code is properly positioned within the bounding box, the JavaScript library will recognize and decode it, triggering the onScanSuccess procedure. We then return to the main page, where the edit control is filled with the text of the QR code and the “Launch Page” button is visible.

What’s Next
In this example, we’re using the “easy mode” of the JavaScript library. This mode functions as a comprehensive component that requires only a few parameters. However, there’s also an advanced mode with numerous individual functions. The advanced mode allows us to take full control of the display and build our own component, customizing its appearance and functionality. Using the advanced mode will lead you further down the JavaScript rabbit hole, and let me warn you “There be landmines in that rabbit hole!”
As mentioned earlier, the QR code return includes more than just the text, which could be necessary for advanced use cases.
Accessing local resources via HTML 5 is broadening opportunities for WEBDEV sites that were previously unattainable without WINDEV Mobile. In an upcoming blog post, I will discuss how to transform our WEBDEV sites into Progressive Web Apps (PWA). This approach further blurs the boundaries, allowing our WEBDEV site to closely resemble a Native Application on both mobile and desktop platforms.
You can find this example in our wxDemo project, on a page named QRTest. Right now (April 11th, 2024) it is also the published page of the site if you would like to play with it online. Here is the dropbox link to the project backup https://www.dropbox.com/scl/fi/09usl9nfc6d0sp8psknbe/wxDemo_v2024.ZIP?rlkey=3jcmratbdyoqirsrcop63v91c&dl=0
