I rarely use the menu controls in my WebDev projects. Most of my projects are more workflow-based and the navigation is custom to the workflow instead of being menu-driven. However, one of our mentoring clients, ask for some assistance with the menu this week, and I thought I would share the results.
First I must say the menu controls have improved quite a bit since the last time I looked at them, especially with the fact that you can now have the based on CSS instead of images. But they still have a few shortcomings.
Let’s take a look at out of the box first in a little sample project I put together. Warning, I created the style for this menu to make it obvious, what was happing, not for its aesthetics.
I created a simple Vertical Drop-down menu with the display mode set to “CSS menu”. It has 3 main menus, creatively called Menu 1, Menu 2, and Menu 3. Each of the main menus has 3 options (Page 1, Page 2, Page 3, etc.). Note only the first option of each menu has been fully coded (Page 1, Page 4, Page 7). Note this menu is on a page template that all the other pages are based on.
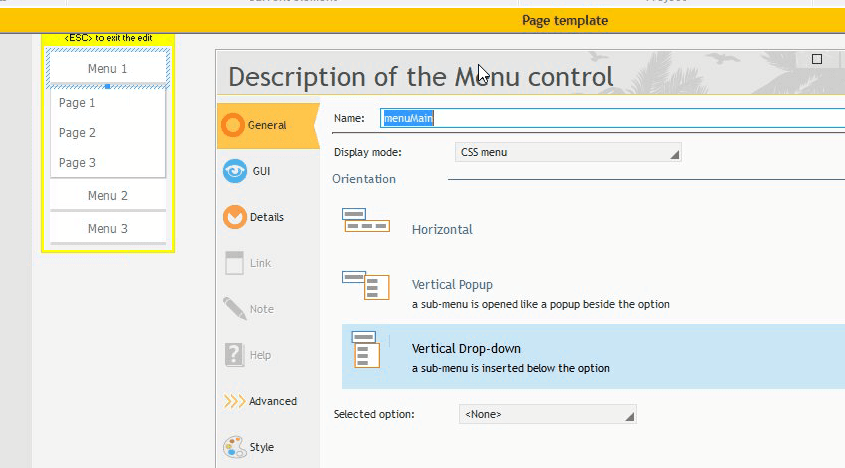
Let’s see how this menu behaves out of the box with the style settings I chose.
When first loaded, all the options are collapsed and nothing is selected.

When hovering over a menu, it has an underline indicating it is selected

Click on a menu and it expands

Hover over an option and it turns red indicating it is selected.
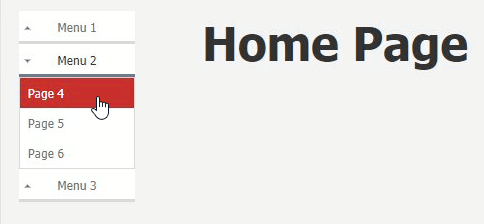
Click on another menu and it also expands, notice the other menu did not collapse.

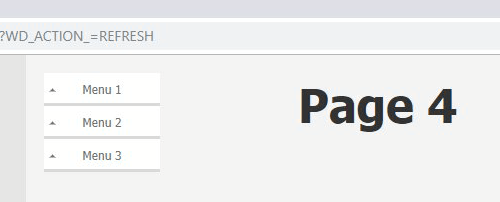
If we go to Page 4, the whole process starts over with everything collapsed and nothing selected.
Functional, but it could certainly be better. Here is a list of our desired behavior changes
- Always have one of the 3 menus expanded
- When expanding one menu, collapse the currently expanded menu.
- When going to Page 4 (or any other page), have the correct menu expanded and the menu option selected, to indicate that is the page we are currently one.
There is one option in the IDE that seems it would help us some with part of #3, and that is “Selected option” on the GUI tab of the option. Note it is only available for the top level of the menus, not the options. But lets at least see what it does. So on Page 4, I turned it on for Menu 2

And this is what Page 4 looks like when it opens now
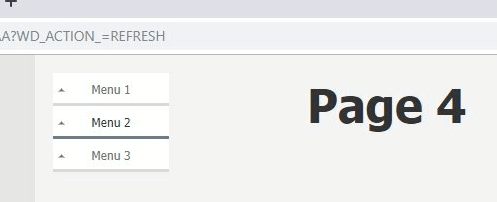
Better, but it didn’t expand the menu, nor is the Page 4 option highlighted. I know you can see it because it isn’t expanded, but trust me it isn’t highlighted. And this would also require us to override and adjust the menu settings for every page.
Right about now if you are familiar with Tree Controls or breaks in tables or loopers you are probably thinking about the Expand and Collapse functions, unfortunately, PCSOFT hasn’t enabled those functions for the menu control.
But with a little digging into the page’s code via the Chrome Developer tools, I discovered that there is a CSS class “wbCollapse” that gets added to the collapsed menus.

And by hovering over the “Selected option” setting in the IDE, I see that there is a property, which means we can adjust it with coding.

Armed with that information, I can achieve all the items on our wish list.
Step 1, anytime I am going to be working with JQuery, CSS, etc. I set the project up to not compress the JavaScript. If you don’t do that all of the IDs in the resulting HTML will be A1, A2, etc. based on the order the controls were created, and can even change if you make drastic changes to the page. When you don’t compress the JavaScript the IDs are based on the control names, which is much easier and reliable to work with. Note there is a slight risk of breaking the JavaScript code if you happen to use a control name that is a reserved word in JavaScript, but as long as you are using prefixes like edt, combo, ck on your controls that isn’t likely.
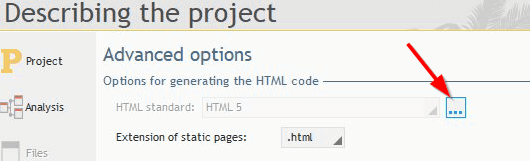
This setting can be set or overridden at the page level, but since we will need it for all the pages of our site we are going to set it at the project level. So, on the Project Description, Advanced tab, you see Options for generating the HTML code and a … button behind the selection.
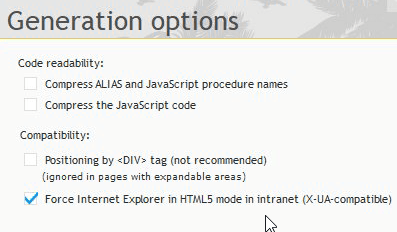
Which takes us to some advanced settings, including the ones we are after concerning JavaScript. There used to be only one JavaScript settings but in V24 it appears to be 2 settings now. I haven’t figured out what each does yet, I thought perhaps I only needed to turn off the first settings to get what I wanted, but I ended up needing both settings turned off.
Next, we need 2 global variables to keep track of which menu and option are selected.

The rest of our code will all be on the page template, there is no custom code required on our pages, other than what automatically gets there from our template.
First, we need a procedure call SetSelected()

Lines 3-5 take care of #1 on our wish list, defaulting Menu 1 to being open if no menu option has been selected, this is why Menu 1 is expanded on the Home page when we are done. It is using the Global Variable (SelectedMenu) that we defined earlier. A word about case, notice MENU1 is in all caps, when WebDev generates the HTML and CSS code based on the control names, it does so in all case, and remember JavaScript code is case sensitive, so since we will be using these values in a bit for some JQuery code we need to make sure the case is correct.
Line 7 actually selects the menu option. We are using Indirection here. If you haven’t see indirection yet, take a look at some of the videos, and articles we have posted about it in the past and read up on it in the PCSOFT documentation. It is one of the most powerful features available to us and allows you to do a lot of dynamic things that just aren’t achievable in that “other programming language that shall not be named”!
Line 9-11 do the same thing for the option if there is one selected. On the home page, there isn’t one, so only the menu gets expanded, but on the other pages there are so the option gets selected, causing it to turn red. Remember the “Selected option” wasn’t available in the IDE for the options? Well, happily it works just fine in the code! Sometimes you just got to try things and see what happens!
Next, in the Global Declarations area, we need to run our SetSelected procedure

Since this is a page template, all the pages will have this code, and we will be setting our 2 global variables before calling a page. Then the first thing the new page will do is run SetSelected which will select the proper menu and option of based on the global variables.
That gets the correct options selected, but the menu still isn’t expanded We need to resort to Jquery code to accomplish that. In the (onload) browser event we add the following code

This removes the wbCollapse class from the menu we want to expand. Being able to understand the resulting HTML, CSS, and JavaScript code well enough to figure out little things like this is why I so strongly encourage anyone that works with WebDev to at least have a rudimentary understanding of the 3. Remember at the end of the day anything you do with WebDev, has to be turned into HTML, CSS or JavaScript, its the only 3 things the browser understands. And knowing and understanding those goes a long way towards being able to step out of the box and extended WebDev.
We are well on our way to checking wish list item #3 off the list, the only thing left is setting the global variables properly when selecting an option. Code similar to below goes in each option of the menu.

Notice line 1 is generic and will be the same code for each option, and sets the global variable to the selected option. Myself is a reserve work that refers to whatever element this code is in. Since this code is in optOption4, that is what Myself refers to, and the ..name property gives us the name of the control. So MySelf..Name = optOption4. Finally, remember we have to capitalize it so it will match the case in JavaScript. Line 2 opens the appropriate page.
Wishlist item #3 checked off the list, all that is left is item #2, collapsing and expanding the menus as they are selected. Each menu item gets the following code
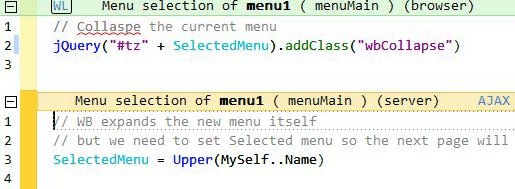
Notice this code is 100% generic and the same for all 3 menu items.
The browser code fires first, so at that point, SelectedMenu is the “old” menu selected, so we just want to add the wbCollaspe class back to it, so that it is collapsed.
We don’t actually need to expand the new selected menu, because that already happens when it is clicked on, so all we do in the server code is set our global variable to the new selected menu, using the same MySelf..Name trick we used on the options.
And just like that we now have a Vertical Submenu that behaves the way we want.
Opening the Home page now has Menu 1 expanded by default

When you click on Menu 2 it expands and Menu 1 collapses.

And finally, when Page 4 is opened, Menu 2 is expanded and Page 4 is selected

You can download the sample project using this link
