Publishing to the App stores is always an adventure. They seem to change the requirements and interface on an almost daily basis. Add to that the extra requirements needed to compile the XCODE for the Apple App store and you start feeling like your juggling flaming chainsaws, while riding a unicycle across a tightrope.
Bill Quinn of Harp Software was kind enough to put together a document outlining his process for us to share with the rest of the community. The rest of this article is “in the words of Bill Quinn”.
Please note I am not a mac guy nor an iOS expert but I have published a few ios apps. There may be easier ways but this gets the app published… usually.
- Get a MacBook. I bought a MacBook air. I highly recommend at least 250gb HD (I went with 500gb) because you will need to keep up with the latest iOS and XCode versions and the downloads are huge.
- install the latest iOS and XCode
- from you Apple developer acct:
- create a developer certificate
- create a distribution certificate
- these both need to be added to your mac’s keychain. Sorry but I don’t recall the specifics of how to do this!
- go to appstoreconnect.apple.com
- fill out all the agreement and contact forms
- in WINDEV Mobile
- set the bundle id to exactly the same as the “Identifier of Bundle” in WINDEV Mobile
- Generate, first screen. Pretty sure it must be all lowercase
- provide properly sized icons (https://appiconmaker.co/)
- generate the iOS project in WINDEV Mobile
- set all “icons of the application”
- I’ve been rejected for not having complete permissions so I recommend setting at least the permissions below:
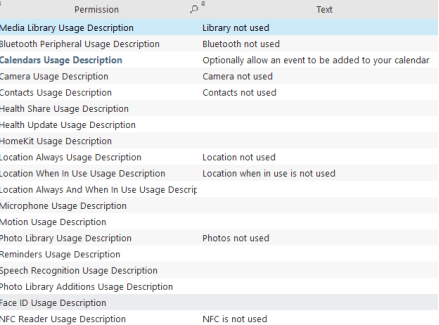
- Also, WINDEV Mobile seems to imply NFC is used, so in the appstoreconnect, in the app review info notes, say you don’t use NFC… unless you do!
- create an app in appstoreconnect
- copy the xcode.gen folder found in exe/ios application to your mac
- run xcode
- ideally, connect an actual iPhone/iPad to your mac for device testing
- select it from the device list
- product/build
- product/run
- when testing is done, select product/archive and distribute
- appstoreconnect requires 2-4 screenshots each for iPhone 8, iPhone 11 (or higher?), iPad 12.9 2nd generation, iPad 12.9 3rd generation. The screenshots should be “representative” of the app in use. Best way to do this is from XCode, select the appropriate simulator from the list of devices and run the app on each device taking screenshots along the way.
- After getting notified your upload has been processed, go back to appstoreconnect and select the app version just uploaded using the plus sign list next to Build
- Complete the various required fields and any instructions needed to test the app – including a login/password if needed. The app will be tested by a real person and can take anywhere from a couple of hours to a week.
- I’ve probably missed a few things but this is most of the steps.
- Good luck!
Again a huge thanks to Bill Quinn for take the time to put this together for sharing with everyone!!!
