
Now that I’ve persuaded you that Tailwind CSS is the solution to all your WEBDEV challenges, it’s time to start using it. This article details my first experience with Tailwind CSS in WEBDEV, some of the problems I encountered, and in true Uncle Pete style, workarounds to overcome these issues.
If you missed it, make sure to check out the first post in this series for a Tailwind CSS Primer.
As mentioned in that post I am working on a series of articles discussing WEBDEV site design with a focus on modern techniques and technologies for aesthetics and user experience. Today, we’ll explore how to choose a default font for a website, how Tailwind CSS can assist in this task, and how to navigate some issues with the WEBDEV Tailwind CSS implementation. By the end of this, we’ll have our project set up with the default font and a solid foundation for further exploration of Tailwind CSS.
Website Default Font Considerations
You might be wondering, an entire article about just the default font? When it comes to web design, establishing these visual elements upfront can spare you a lot of trouble down the road. Many factors come into play when selecting a font, beyond mere aesthetics. Naturally, you want a font that is easy to read. However, it’s crucial to choose a font that looks good across various platforms, including a Windows desktop, Linux machine, Mac desktop, iPhone, and Android phone. The goal is to ensure it renders closely to its design, regardless of the display device. Ideally, the font should render without requiring any downloads. This helps avoid layout shifts, screen flashes, browser caching issues, and other challenges associated with custom fonts.
Allow me to introduce Modern Font Stacks. This is why I appreciate the direction PCSOFT is taking by adopting more web standard techniques and implementations. We seldom need to reinvent the wheel, as there’s likely someone who has already done much of the work for us.
After reviewing the descriptions of the various font families, I’ve chose Humanist as my default font and Geometric Humanist for headings. Although I may incorporate a few other font families for specific purposes, the majority of the site will feature these two.
It might be helpful to explain what a font family is. A font family is a prioritized list of one or more fonts. If the first font in the list isn’t available on the device displaying the site, the next font is then attempted, and so on. Typically, the font family list ends with a generic font, such as serif, sans serif, or system-ui, which is guaranteed to exist on every browser.
If we were solely working with HTML/CSS, we would simply include the appropriate font family in our CSS and we would be off to the races!
font-family: Seravek, 'Gill Sans Nova', Ubuntu, Calibri, 'DejaVu Sans', source-sans-pro, sans-serif;
Adding a font-family to WEBDEV (the old way)
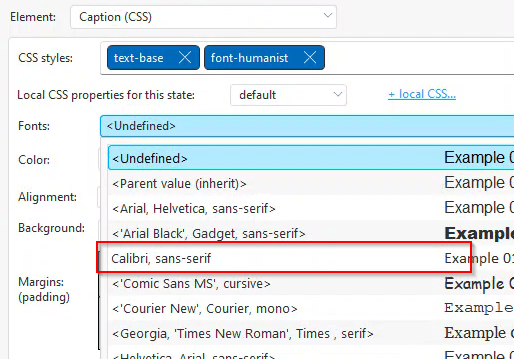
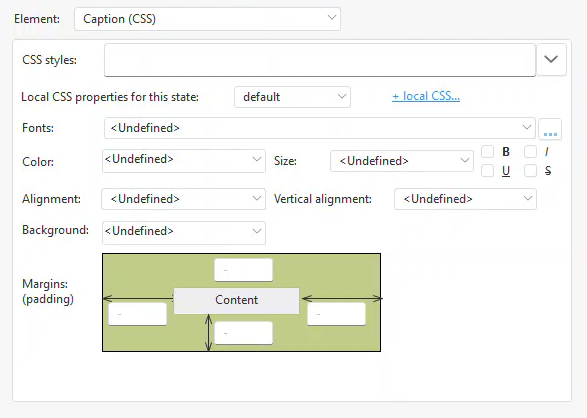
Open the Description window for a static control on one of your pages. Although other control types could work too, the static control is the simplest. In the Fonts dropdown, you will find a list of font families that WEBDEV has built in.
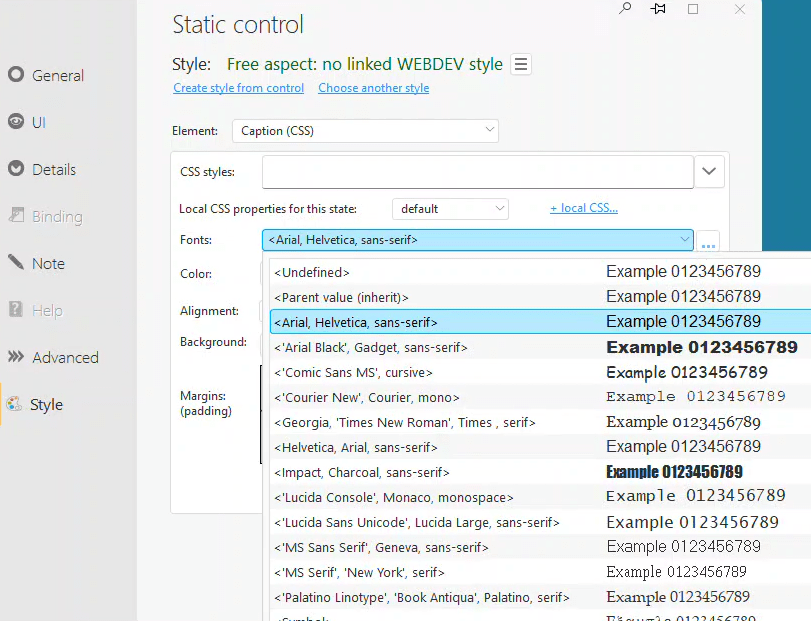
Of course, the exact font-family we want isn’t available. Clicking the ‘…’ button next to the dropdown menu opens the font window.
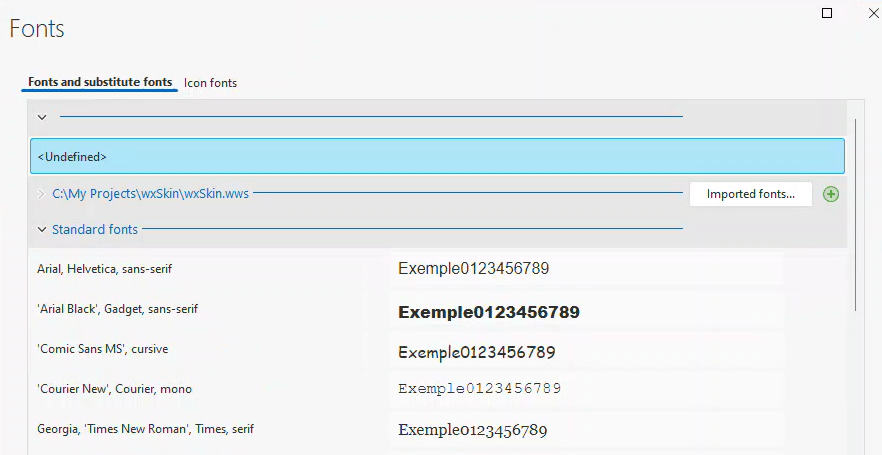
We can see the same list under Standard fonts, as well as a list of project-specific fonts, which are currently non-existent. The <undefined> at the top indicates the font currently defined for the page. For some reason, the ‘Imported fonts..’ button and ‘+’ button are disabled when we access this screen via this path. However, if we use the ribbon bar menu to navigate to Page→Styles→Edit font list…, we will see the same screen, but it will only display the project fonts and the two buttons will be enabled. Click on the ‘+’ button to add a new font set.
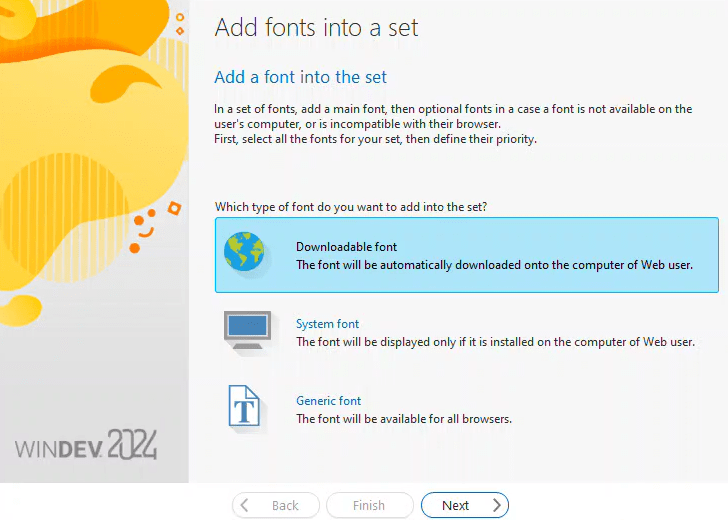
We don’t want to use a downloadable font. The main advantage of this font family is that it doesn’t require any downloads. So, let’s start with a system font.
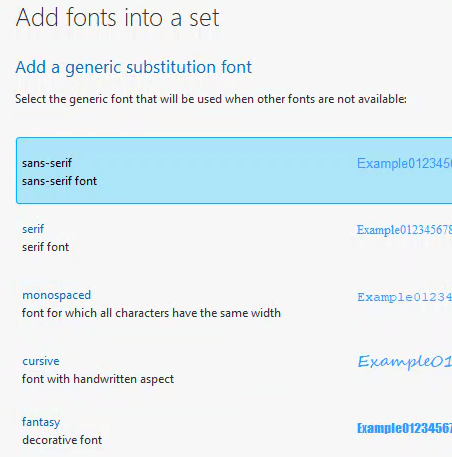
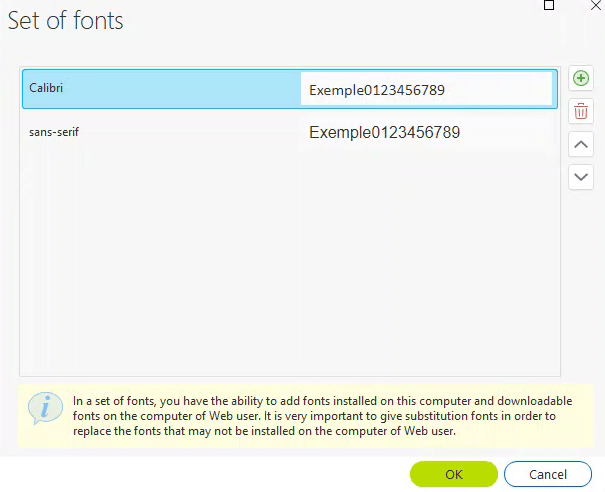
This displays a list of fonts on my computer. The first one from the list that exists on my system is Calibri, so I select it. Then, it prompts me to choose a generic substitution font. Sans-serif is the final font in the list we are creating, so I select that.
Once we finish with that screen, it brings us back to the first screen where our font list is compiled.
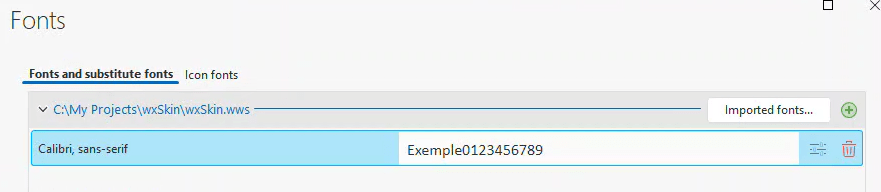
However, we need to add more to that list. Click the ‘slide bars’ button to the left of the trashcan to edit the list. This action will display the fonts currently in the list and allow us to add or delete fonts, as well as reorder the list.
Pressing the ‘+’ button takes us to a screen where we can choose a font. The options include selecting a font from Google Fonts to use directly, importing a Google Font into our project, or importing a font from our computer into the project.
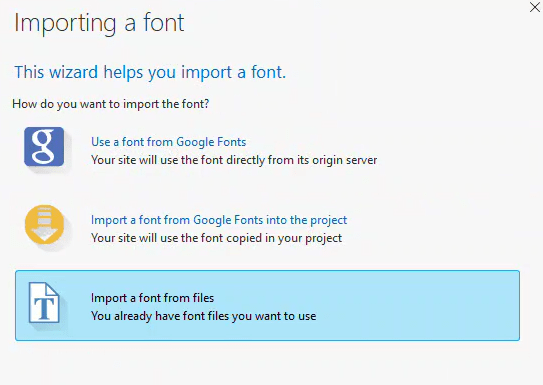
All three options will result in a font download for the end user if they don’t already have it. Remember, most of the fonts we’re trying to include are not available on Google Fonts or on my machine. They’re specific to certain operating systems.
It seems we cannot directly create a font list that would correspond to the font-family entry we desire in our CSS. While it may be possible to work around this by downloading fonts and manually altering some files to avoid triggering a download on the user’s machine, there’s a more efficient solution using Tailwind CSS. Before we proceed, if you’re satisfied with the fonts available through this method, you’ll find your new font list in the list of fonts once we complete these steps.
This interface, with its shortcomings, exemplifies the old WEBDEV approach. In this approach, developers were sheltered from complexities and given abstracted interfaces far from standard web protocols. This is beneficial for WEBDEV developers who prefer not to delve into the details of HTML/CSS/JS in web development.
However, the issue lies in the creation of a ‘black box’ that hinders those of us who want to get more involved with the technical aspects of web development. This is a clear example where an “advanced” mode allowing direct input of CSS font-family text into an entry field could be beneficial.
Adding a font-family with Tailwind CSS
Let’s momentarily set aside WEBDEV and explore how we would approach this task using Tailwind CSS in a pure HTML/CSS context. Once again since we are using web standard technologies, someone has already done the heavy lifting for us. This link https://github.com/BorisAnthony/mfs-tailwind directs you to a GitHub project which provides the precise entries required for your tailwind.config.js file.
module.exports = {
  corePlugins: {},
  content: [],
  theme: {
    fontFamily: { // <https://github.com/system-fonts/modern-font-stacks>
      systemui:     ['system-ui', 'sans-serif'],
      transitional: ['Charter', 'Bitstream Charter', 'Sitka Text', 'Cambria', 'serif'],
      oldstyle:     ['Iowan Old Style', 'Palatino Linotype', 'URW Palladio L', 'P052', 'serif'],
      humanist:     ['Seravek', 'Gill Sans Nova', 'Ubuntu', 'Calibri', 'DejaVu Sans', 'source-sans-pro', 'sans-serif'],
      geohumanist:  ['Avenir', 'Montserrat', 'Corbel', 'URW Gothic', 'source-sans-pro', 'sans-serif'],
      classhuman:   ['Optima', 'Candara', 'Noto Sans', 'source-sans-pro', 'sans-serif'],
      neogrote:     ['Inter', 'Roboto', 'Helvetica Neue', 'Arial Nova', 'Nimbus Sans', 'Arial', 'sans-serif'],
      monoslab:     ['Nimbus Mono PS', 'Courier New', 'monospace'],
      monocode:     ['ui-monospace', 'Cascadia Code', 'Source Code Pro', 'Menlo', 'Consolas', 'DejaVu Sans Mono', 'monospace'],
      industrial:   ['Bahnschrift', 'DIN Alternate', 'Franklin Gothic Medium', 'Nimbus Sans Narrow', 'sans-serif-condensed', 'sans-serif'],
      roundsans:    ['ui-rounded', 'Hiragino Maru Gothic ProN', 'Quicksand', 'Comfortaa', 'Manjari', 'Arial Rounded MT', 'Arial Rounded MT Bold', 'Calibri', 'source-sans-pro', 'sans-serif'],
      slabserif:    ['Rockwell', 'Rockwell Nova', 'Roboto Slab', 'DejaVu Serif', 'Sitka Small', 'serif'],
      antique:      ['Superclarendon', 'Bookman Old Style', 'URW Bookman', 'URW Bookman L', 'Georgia Pro', 'Georgia', 'serif'],
      didone:       ['Didot', 'Bodoni MT', 'Noto Serif Display', 'URW Palladio L', 'P052', 'Sylfaen', 'serif'],
      handwritten:  ['Segoe Print', 'Bradley Hand', 'Chilanka', 'TSCu_Comic', 'casual', 'cursive'],
    },
    extend: {},
  }
}
At this point, we can access the desired font-family using the Tailwind class ‘font-humanist’. However, it’s not yet set as our default font. This isn’t an issue, as Tailwind uses whatever is defined as the ‘font-sans’ font as the default. To make ‘font-humanist’ our default, we simply add one more line to the configuration file.
sans: ['Seravek', 'Gill Sans Nova', 'Ubuntu', 'Calibri', 'DejaVu Sans', 'source-sans-pro', 'sans-serif'],
If we were working in pure HTML/CSS, we’d once again be off to the races. The final piece of this puzzle is integrating everything in WEBDEV.
Adding a font-family to WEBDEV with Tailwind CSS (the new way)
If you’ve read the first post in this series, you’ve already enabled Tailwind CSS in your project, which means you’ve completed step 1. Enabling Tailwind CSS initiates a few processes within WEBDEV and your project.
- The tailwind.config.js file has been created in your project folder.
- A tailwind.css file has been created in the ext folder under your {Project}_WEB directory.
- Every page generated by your project includes a link to the tailwind.css file.
- The IDE considers the CSS in that file when displaying pages in the page editor, maintaining a WYSIWYG-ish format.
- Finally, through some form of black magic, WEBDEV starts the Tailwind CSS CLI. It scans the generated HTML files for any Tailwind class usage, continually updating the tailwind.css file. More on this later!
Our next step is to update the tailwind.config.js file, as mentioned above. If we open this file in our project folder, we’ll see that WEBDEV has already made a few modifications. The content list has been adjusted to match the source files that WEBDEV generates, and a few standard plugins have been added.
/** @type {import('tailwindcss').Config} */
module.exports = {
  content: ["./**/*.html","./**/*.htm", "./**/*.php"],
  theme: {
    extend: {},
  },
  plugins: [
    require('@tailwindcss/typography'),
    require('@tailwindcss/forms')({
       strategy: 'class', // only generate classes
    }),
    require('@tailwindcss/line-clamp'),
    require('@tailwindcss/aspect-ratio'),
],
}
- The typography plugin https://github.com/tailwindlabs/tailwindcss-typography offers basic styling for standard HTML elements such as <h1> and <li> when used within a container that includes the ‘prose’ class.
- The forms plugin https://github.com/tailwindlabs/tailwindcss-forms relates to HTML forms. It enables a basic reset of standard form styles, meaning they can be set using Tailwind utility classes. However, the ‘strategy: class’ setting prevents global styles and includes only the Tailwind form classes, which must be manually added. We’ll delve deeper into these settings as we continue exploring Tailwind.
- The line-clamp plugin https://github.com/tailwindlabs/tailwindcss-line-clamp allows control over the length of truncated text. We’ll discuss this in more detail later.
- The aspect-ratio plugin https://github.com/tailwindlabs/tailwindcss-aspect-ratio allows you to set fixed aspect ratios for elements. Although this feature has been somewhat superseded by native aspect-ratio support from Tailwind CSS v3.0 onwards, Safari 14 does not support the native aspect-ratio. We might need to investigate this issue further in the future.
For now, we need to add our fontFamily settings to the config file, which should result in something like this.
/** @type {import('tailwindcss').Config} */
module.exports = {
  content: ["./**/*.html","./**/*.htm", "./**/*.php"],
  theme: {
	  fontFamily: { // <https://github.com/system-fonts/modern-font-stacks>
      systemui:     ['system-ui', 'sans-serif'],
      transitional: ['Charter', 'Bitstream Charter', 'Sitka Text', 'Cambria', 'serif'],
      oldstyle:     ['Iowan Old Style', 'Palatino Linotype', 'URW Palladio L', 'P052', 'serif'],
      humanist:     ['Seravek', 'Gill Sans Nova', 'Ubuntu', 'Calibri', 'DejaVu Sans', 'source-sans-pro', 'sans-serif'],
      geohumanist:  ['Avenir', 'Montserrat', 'Corbel', 'URW Gothic', 'source-sans-pro', 'sans-serif'],
      classhuman:   ['Optima', 'Candara', 'Noto Sans', 'source-sans-pro', 'sans-serif'],
      neogrote:     ['Inter', 'Roboto', 'Helvetica Neue', 'Arial Nova', 'Nimbus Sans', 'Arial', 'sans-serif'],
      monoslab:     ['Nimbus Mono PS', 'Courier New', 'monospace'],
      monocode:     ['ui-monospace', 'Cascadia Code', 'Source Code Pro', 'Menlo', 'Consolas', 'DejaVu Sans Mono', 'monospace'],
      industrial:   ['Bahnschrift', 'DIN Alternate', 'Franklin Gothic Medium', 'Nimbus Sans Narrow', 'sans-serif-condensed', 'sans-serif'],
      roundsans:    ['ui-rounded', 'Hiragino Maru Gothic ProN', 'Quicksand', 'Comfortaa', 'Manjari', 'Arial Rounded MT', 'Arial Rounded MT Bold', 'Calibri', 'source-sans-pro', 'sans-serif'],
      slabserif:    ['Rockwell', 'Rockwell Nova', 'Roboto Slab', 'DejaVu Serif', 'Sitka Small', 'serif'],
      antique:      ['Superclarendon', 'Bookman Old Style', 'URW Bookman', 'URW Bookman L', 'Georgia Pro', 'Georgia', 'serif'],
      didone:       ['Didot', 'Bodoni MT', 'Noto Serif Display', 'URW Palladio L', 'P052', 'Sylfaen', 'serif'],
      handwritten:  ['Segoe Print', 'Bradley Hand', 'Chilanka', 'TSCu_Comic', 'casual', 'cursive'],
	  sans:     ['Seravek', 'Gill Sans Nova', 'Ubuntu', 'Calibri', 'DejaVu Sans', 'source-sans-pro', 'sans-serif'],
	  },
    extend: {},
  },
  plugins: [
    require('@tailwindcss/typography'),
    require('@tailwindcss/forms')({
       strategy: 'class', // only generate classes
    }),
    require('@tailwindcss/line-clamp'),
    require('@tailwindcss/aspect-ratio'),
],
}
At this point we should be off to the races once more, unfortunately our horse gets hung up in the gate for a bit. But we eventually get him out of the gate and somehow he still manages to place. I will omit some of the intermediate steps I went through and only provide the highlights.
I created a basic page without setting a default font. Remember, we weren’t able to include our desired font-family in the list, so we shouldn’t use an alternative that could override the one we successfully incorporated using Tailwind.

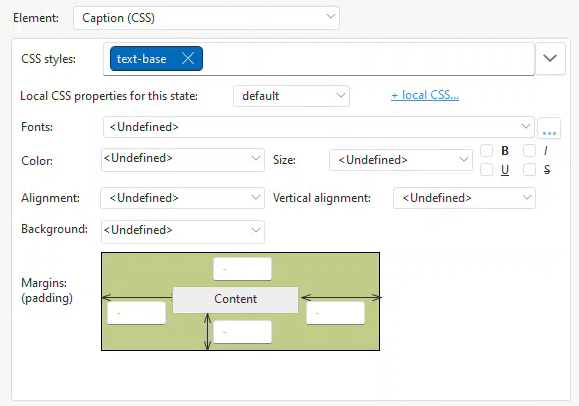
I created three static controls. None of them have any local CSS set.
- stcNoClasses – Does not include any CSS classes or settings.
- stcJustBase – Includes the Tailwind class ‘text-base’.

- stcBaseAndFont – Includes Tailwind classes: ‘text-base’, ‘font-humanist’.
Since we’ve set the default font in the Tailwind config file, all three of these statics should produce the same result. To validate this, I’ve created a simple, pure HTML example that replicates this setup outside of WEBDEV.
<!doctype html>
<html>
<head>
  <meta charset="UTF-8">
  <meta name="viewport" content="width=device-width, initial-scale=1.0">
  <link href="./output.css" rel="stylesheet">
</head>
<body>
  <div>
 No Classes<br>
 Line 2<br>
 Line 3
 </div>
 <div  class="text-base">
 Just Base<br>
 Line 2<br>
 Line 3
 </div>
 <div  class="text-base font-humanist">
 Base and Font<br>
 Line 2<br>
 Line 3
 </div>
</body>
</html>
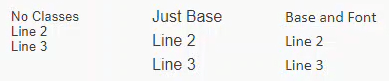
As expected, all three <div> elements render exactly the same. It might not be a very exciting page, but it serves its purpose. 🙂
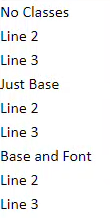
Unfortunately, the same cannot be said for our render from WEBDEV.
You may also notice that they don’t display identically in the IDE as they do when rendered, especially the first one that has no classes.
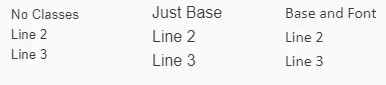
Why? stcBaseAndFont displays correctly because we are manually setting both the font and the size, rather than relying on the defaults. In contrast, stcJustBase uses the correct size (1rem) but appears larger because it uses the sans-serif font instead of our designated font-family. Meanwhile, stcNoClasses uses not only the sans-serif font, but also a size of .833333 rem.
But Why? Because the standard.css file, generated by WEBDEV, creates CSS that interferes with our tailwind.css file.
I discovered all of this using the browser’s developer tools. As I’ve mentioned many times, these tools are crucial if you aspire to be a web developer.

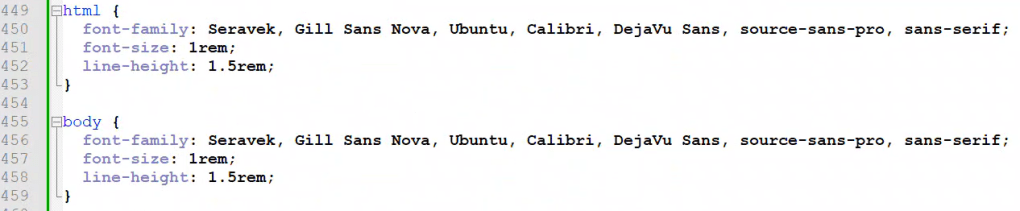
Upon examining the standard.css file, you will find a body tag that sets the font and size.

If we don’t specify any classes, as in the case of stcNoClasses, it inherits settings from standard.css. However, when we specify the ‘text-base’ class for stcJustBase, it stops inheriting the size but continues to receive the font from the body tag.
We could stop here and simply ensure that every setting is specified, without relying on any defaults. However, as we delve deeper into using Tailwind, I’m confident it will continue to be thorn in our side if we don’t resolve it now. So, I decided to put on my big boy pants and find a solution. And just for clarification, there’s no special pair of “big boy pants” involved, those are the only kind I own! 🙂
Initially, I considered replacing the standard.css file with an empty one. However, it constantly regenerates and keeps overriding my blank version.
My subsequent approach was to create an additional CSS file and include it as an external CSS. Since it follows standard.css, it would override its settings, returning the size and font-family to the desired values. While this resolved the browser rendering issues, it introduced several challenges. The primary issue was that the IDE doesn’t consider external CSS files in the page editor, making the page editor far from a true WYSIWYG experience. As a result, this approach was unfeasible.
Let’s turn to Tailwind for a solution. When you examine the basic “getting started” information for Tailwind, you’ll notice that the example begins the CLI with a ‘-i input.css’ parameter.
tailwindcss -i ./src/input.css -o ./src/output.css --watch
This input file, along with all source files that match the ‘content’ parameter in your config file, is used to generate the output file. In the example code, it imports ‘input.css’ and generates ‘output.css’. As we’ve previously noted in WEBDEV, the output is ‘tailwind.css’.
One of the great features of Tailwind is the ability to include functions and directives in the input.css file, which we will discuss shortly. This was another limitation of my initial external CSS file solution, where I couldn’t use Tailwind directives. As a result, I had to code the settings as standard CSS. This not only required deeper knowledge of CSS, but would also created additional maintenance if I ever decided to change the default.
To resolve the issue stemming from standard.css, we must generate HTML and BODY tags with the correct CSS into our output file, tailwind.css. Therefore, I created an input-tailwind.css file in my project’s root folder containing the following code.
@tailwind base;
@tailwind components;
@tailwind utilities;

@layer base {
	html {
		@apply font-humanist;
		@apply text-base;
	}
	body {
		@apply font-humanist;
		@apply text-base;
	}
}
The first three lines import the Tailwind utility classes.
The @layer directive instructs Tailwind which “bucket” to place the custom styles in. In this case, we are adding to the base styles.
The @apply directive substitutes the appropriate CSS from the specified Tailwind utility class. In our case, we want to include the CSS from both ‘font-humanist’ and ‘text-base’ in the HTML and BODY tags. This will override the settings from the standard.css file. Technically, I might only need the BODY tag in this case, but I am a belt and suspenders kind of guy!
Now that we have our input file, the next step is to instruct the Tailwind CLI to use it. However, there’s a hurdle. Recall when I explained the process of enabling Tailwind in your project, and how step 5 involved some black magic that runs the Tailwind CLI. The challenge here is that we can’t modify that black magic.
Don’t worry, we’ll run the command ourselves and include the -i parameter. After some investigation, I found that PCSOFT includes the Tailwind CLI in the ‘WINDEV 2024\Programs\Tools\Node’ folder.
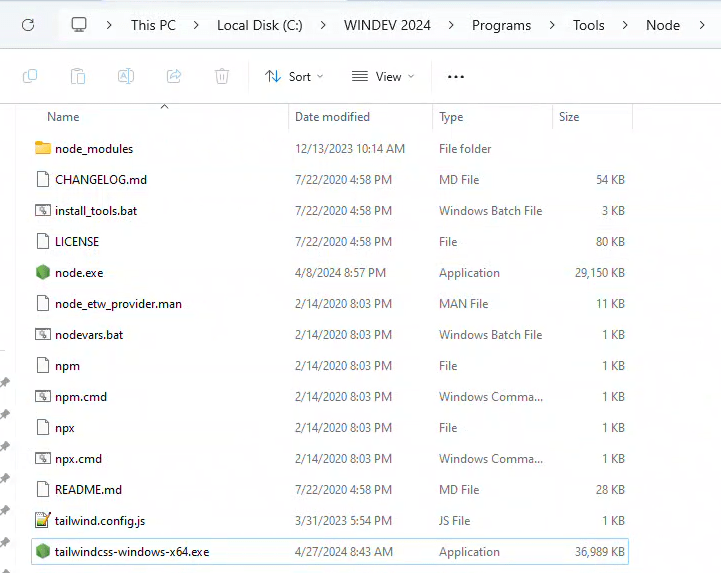
By executing the command below, we can generate the tailwind.css file, which will incorporate the settings from our input-tailwind.css file.
"C:\\WINDEV 2024\\Programs\\Tools\\Node\\tailwindcss-windows-x64.exe" -c tailwind.config.js -i input-tailwind.css -o ./wxskin_web/ext/tailwind.css
Upon examining the resulting tailwind.css file, we notice that the Tailwind utility classes we specified have been replaced with actual CSS code.
With this method, our page not only renders correctly in the browser, but also appears properly in the IDE’s page editor. This is due to the IDE considering the tailwind.css file, unlike the external CSS file we attempted to use earlier.
This would be an ideal solution if not for one problem. The WEBDEV version of the CLI is still running, via that black magic, and competing with the command we just executed. As soon as you save a page, it triggers and generates a version of the tailwind.css file that doesn’t use our input file. The only way I was able to confirm that the IDE would display correctly was by manually generating the tailwind.css file and making it read-only to prevent WEBDEV from regenerating it.
Solving this issue was quite challenging and I may have sacrificed a bit more of what little hair I have. While the solution isn’t as straightforward as having it working right out of the box, it’s a viable workaround until PCSOFT resolves the problem.
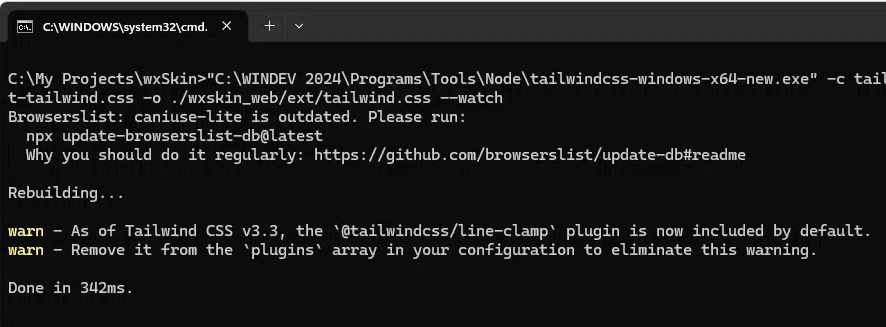
I realized that if WEBDEV couldn’t locate the Tailwind CLI, it wouldn’t be able to run it. Therefore, I renamed the EXE in the Programs\Tools\Node directory and adjusted my command to use the new EXE name. I also added the —watch parameter to the command and created a .BAT file named wxtailwind.bat. The watch command allows the CLI to monitor the files and automatically regenerate them whenever there’s a change. Having a .BAT file lets me run it directly from File Explorer. My final wxtailwind.bat file appears as follows:
"C:\\WINDEV 2024\\Programs\\Tools\\Node\\tailwindcss-windows-x64-new.exe" -c tailwind.config.js -i input-tailwind.css -o ./wxskin_web/ext/tailwind.css --watch
Hint: My executable is called tailwindcss-windows-x64-new.exe for a reason, which will be revealed in the bonus material below.
Now, when we open the project in WEBDEV, it can’t find the Tailwind CLI, preventing it from starting a version that might compete with ours. All we need to do is run the wxtailwind.bat file from our project folder. This process opens a command window, generates the tailwind.css file, and starts monitoring for any changes. Finally, we’re off to the races, out of the gate, and I believe we can not only keep pace but surpass the competition!
I have forwarded all of this to support and will update this article when I receive a response. While I believe the generation of standard.css should be reviewed and reconsidered when Tailwind is enabled, a more crucial feature needed is the ability to set an input file for Tailwind generation or a method to manually configure the Tailwind CLI parameters.
Bonus Material
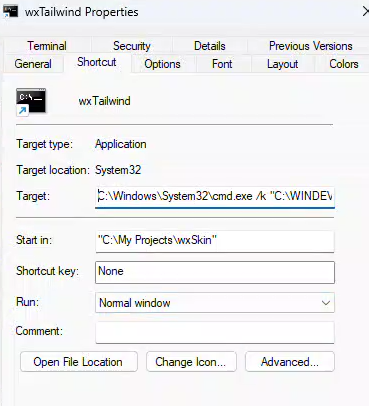
- Creating a Windows Shortcut might be a more effective solution than using a .BAT file. This approach will keep the command window open should the CLI crash or encounter an error. Below is an example of what the shortcut looks like. The /k is the key setting. Someone more knowledgeable may have an even better method for this.
- I suggested that someone more knowledgeable might have a superior approach. Glenn Rathke immediately provided a better solution before my blog post was even published. He introduced me to an IDE feature that has been around for a while, but I was unaware of. Glenn is an expert in these handy IDE tips and tricks. If you haven’t explored his training offerings, I highly recommend you visit https://www.wxtraining.net/.
Click on the IDE logo located at the top right corner of the screen. This action will open a menu with a “CustomMenu” option, where you can create your own menus.
Not only can you create your own menu, but it also includes macros for use in the setup. Although it’s a bit hard to see in this screenshot, I’m using the {$ProjectName} macro in the command before _WEB, and the {$ProjectDir} in the runtime directory. Additionally, I’ve turned on the options to Display the console and Leave the console open.
Here is the text from the Command script area.
- I suggested that someone more knowledgeable might have a superior approach. Glenn Rathke immediately provided a better solution before my blog post was even published. He introduced me to an IDE feature that has been around for a while, but I was unaware of. Glenn is an expert in these handy IDE tips and tricks. If you haven’t explored his training offerings, I highly recommend you visit https://www.wxtraining.net/.
"C:\WINDEV 2024\Programs\Tools\Node\tailwindcss-windows-x64-new.exe" -c tailwind.config.js -i input-tailwind.css -o ./{$ProjectName}_web/ext/tailwind.css --watch
Now, accessing the Tailwind Generation menu is as simple as clicking on the logo. Provided that the project is set up using standard names, it will work with any project. Now we can initiate the Tailwind Generation without even opening the file explorer. THANK YOU GLENN!
- Remember, Tailwind uses a Just-In-Time (JIT) compiler to generate your tailwind.css file when changes are made to your pages. With various factors like WEBDEV, Tailwind, Windows, and even the phases of the moon, there are plenty of opportunities for timing or caching issues that can cause anomalies. For instance, if you haven’t used a Tailwind utility class in your project before, it won’t exist in your tailwind.css. If you add the class ‘text-red-600’ to a static element, initially nothing happens. You need to save the page first. This triggers the Tailwind CLI to detect that a file has changed and regenerate it. Then, WEBDEV needs to load the new tailwind.css file and finally update the page editor display. As you can see, there are many chances for things to go awry. Here are a few tricks I’ve learned to realign things when the display doesn’t update correctly.
- The Project→Generate configuration option appears to regenerate all pages, which triggers the Tailwind CLI to do the same. While the Recompile project and generate HTML pages option should theoretically accomplish this as well, I have found the Generate configuration option to yield more consistent results.
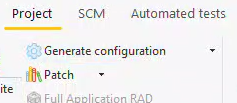
- Sometimes, when tailwind.css is regenerated, the Page Editor in the IDE does not trigger a redisplay. To resolve this issue, close the page in the IDE and reopen it.
- Even if you don’t adopt my complete replacement of the WEBDEV black magic for running the Tailwind CLI, creating a batch file for on-demand generation could still be useful.
- The Project→Generate configuration option appears to regenerate all pages, which triggers the Tailwind CLI to do the same. While the Recompile project and generate HTML pages option should theoretically accomplish this as well, I have found the Generate configuration option to yield more consistent results.
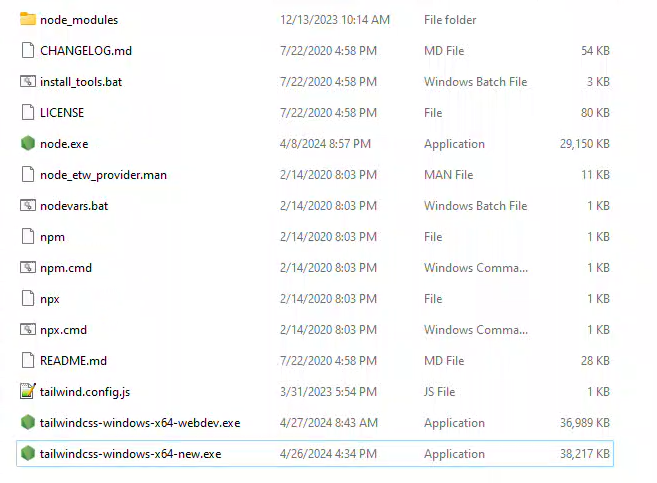
- The top of the tailwind.css file indicates the version of the Tailwind CLI used to generate the file. As of version 2024 76p, it’s Tailwind CSS version 3.2.4. Now that we’re taking over the management and operation of Tailwind CSS, it makes sense to update to the latest version. That’s why my EXE was named tailwindcss-windows-x64-new.exe! Visit https://github.com/tailwindlabs/tailwindcss/releases/tag/v3.4.3 to download the latest version. I placed the new file in the same folder as the original one from PCSOFT. The original copy was renamed to tailwindcss-windows-x64-webdev.exe for backup purposes, and the new one was named tailwindcss-windows-x64-new.exe. Note that if any file is named tailwindcss-windows-x64.exe, the black magic will once again be able to automatically run the file and possibly interfere with your attempts to use it manually.
- Now that we’ve updated to version 3.4.3, we receive a message stating that the line-clamp utilities have been included since version 3.3. Therefore, we can eliminate this from our config file.
/** @type {import('tailwindcss').Config} */
module.exports = {
  content: ["./**/*.html","./**/*.htm", "./**/*.php"],
  theme: {
	  fontFamily: { // https://github.com/system-fonts/modern-font-stacks
      systemui:     ['system-ui', 'sans-serif'],
      transitional: ['Charter', 'Bitstream Charter', 'Sitka Text', 'Cambria', 'serif'],
      oldstyle:     ['Iowan Old Style', 'Palatino Linotype', 'URW Palladio L', 'P052', 'serif'],
      humanist:     ['Seravek', 'Gill Sans Nova', 'Ubuntu', 'Calibri', 'DejaVu Sans', 'source-sans-pro', 'sans-serif'],
      geohumanist:  ['Avenir', 'Montserrat', 'Corbel', 'URW Gothic', 'source-sans-pro', 'sans-serif'],
      classhuman:   ['Optima', 'Candara', 'Noto Sans', 'source-sans-pro', 'sans-serif'],
      neogrote:     ['Inter', 'Roboto', 'Helvetica Neue', 'Arial Nova', 'Nimbus Sans', 'Arial', 'sans-serif'],
      monoslab:     ['Nimbus Mono PS', 'Courier New', 'monospace'],
      monocode:     ['ui-monospace', 'Cascadia Code', 'Source Code Pro', 'Menlo', 'Consolas', 'DejaVu Sans Mono', 'monospace'],
      industrial:   ['Bahnschrift', 'DIN Alternate', 'Franklin Gothic Medium', 'Nimbus Sans Narrow', 'sans-serif-condensed', 'sans-serif'],
      roundsans:    ['ui-rounded', 'Hiragino Maru Gothic ProN', 'Quicksand', 'Comfortaa', 'Manjari', 'Arial Rounded MT', 'Arial Rounded MT Bold', 'Calibri', 'source-sans-pro', 'sans-serif'],
      slabserif:    ['Rockwell', 'Rockwell Nova', 'Roboto Slab', 'DejaVu Serif', 'Sitka Small', 'serif'],
      antique:      ['Superclarendon', 'Bookman Old Style', 'URW Bookman', 'URW Bookman L', 'Georgia Pro', 'Georgia', 'serif'],
      didone:       ['Didot', 'Bodoni MT', 'Noto Serif Display', 'URW Palladio L', 'P052', 'Sylfaen', 'serif'],
      handwritten:  ['Segoe Print', 'Bradley Hand', 'Chilanka', 'TSCu_Comic', 'casual', 'cursive'],
	  sans:     ['Seravek', 'Gill Sans Nova', 'Ubuntu', 'Calibri', 'DejaVu Sans', 'source-sans-pro', 'sans-serif'],
	  },
    extend: {},
  },
  plugins: [
    require('@tailwindcss/typography'),
    require('@tailwindcss/forms')({
       strategy: 'class', // only generate classes
    }),
    require('@tailwindcss/aspect-ratio'),
],
}
- If you see another warning in the command window: “Browserlist: caniuse-lite is outdated”, don’t worry. This is a bug in the command-line interface (CLI) that’s listed on GitHub’s issue tracker.

I received a response from PCSOFT support. The issue with not being able to create a Font Family and with the standard.css overriding some of the Tailwind CSS settings has been forwarded to development for study.
Adding the ability to specify an import file for the Tailwind CLI has been forwarded to development as a suggestion
LikeLike
Hi Pete,
Did they ever fix this in v2025? (or even v2024)
Cheers
Bob
LikeLike
Unfortunately have have not seen any evidence that they have done anything with Tailwind CSS since they first added it. All the issues I highlighted are still there, and they are still using the version of the Tailwind CLI that they first released with WEBDEV. I have it working with my work arounds in a couple of projects and it does make it so much easier for me to get the Look and Feel I want, but it could be so much better if they would address the issues.
LikeLike