
No I didn’t fall asleep on the keyboard again. Today we are going to talk about how to setup your webservers in a more secure and robust way. Since Amazon AWS and Apache are what I know that is the technology we will be using, but I am sure other cloud hosting platforms offer similar.
First, let’s get some definitions for all those acronyms and a little background on how each applies to today’s solution:
AWS – Amazon Web Services, this is Amazon’s entire cloud computing offering, similar to Microsoft Azure or Google Cloud Platform. But don’t ask me how to do any of this in anything other than AWS as that is the only platform we use
ALB – Application Load Balancer, this service allows us to present one web application to the outside world but use multiple servers internally. It is quite robust and can balance the traffic across multiple servers automatically or you can get deep in the weeds with rules and conditions to control routing and many other things. We are not going to get deep into the ALB today, but if we want to use the WAF we must setup an ALB even if we only have one server because Amazon does not allow us to target an EC2 instance directly from the WAF, so our WAF targets the ALB which in turn directs the traffic to our EC2 instance(s). And yes we can setup an ALB with only one server, which seems like a misnomer since there is nothing to balance, but think of the ALB as a traffic cop directing traffic to where it needs to go.
WAF – Web Application Firewall, this is the service that is the actual star of today’s article. Most of you likely understand the basic concept of what a what a firewall does, it is that other form of a traffic cop, it doesn’t direct traffic but determines if the traffic should be allowed at all. Hardware firewalls can get quite complicated with configuring routing tables, rules, etc. Since we are using cloud computing we don’t have access to a true hardware firewall, but instead of a software firewall. Many of you I am sure are familiar with configuring windows advanced firewall for you development machine or perhaps even your web servers. When I setup webservers I disable Windows firewall, my primary issue is that this allows the traffic to reach the server and then the server has to use additional resources to decide if it should allow the traffic or not. Stopping the traffic before it ever gets to the server is a much better way to do this, allowing the server resource to be used only for legitimate traffic. Up until now I have been doing this primary by the use of EC2 Security Groups and ACLs (Access Control List), which has served us well, but require manual configuration and maintenance. There has always been an issue with web crawlers making too many request and consuming all the resources of a server to the point of creating the equivalent of a denial of service request, as the server no longer has enough resources to respond to legitimate request. But with the rise of AI bots crawling the web this has increasingly become more and more of an issue. In that last few months there have been multiple instance were I have had to manually add a range of IP addresses to our ACL list to block them when an AI bot was slowing our server down to the point of being unusable. ACL’s are also limited in the number of entries you can have. WAF is the answer to these and many other issues. It is an intelligent software firewall. Not only can you add your own rules to it, but there are a number of managed rule sets, both paid and unpaid, available from Amazon and other providers. This rules can be quite complex, instead of simple allow or deny rules. For example you can limit based on the number of request from the same source, which in effect automatically throttles AI bots so they are unable to hog resources. We won’t get into a lot of complex configuration of the WAF today, we are just going to go over how to get everything setup and working with WEBDEV. There many be follow up post in the future covering any complex WAF configuration we end up doing for different projects.
ACM – Amazon Certificate Manager, since our ALB is what is actually public facing, that is where our certificate needs to be so that the site can be served over via HTTPS and SSL. We could use an paid certificate authority if we like, or free certificates from Let’s Encrypt as I have shown you in the past, but since we are inside the AWS Cloud infrastructure, an easier way is to use the ACM which provides us with free certificates. The downside to ACM is you can not export the private key, which means we can not use them directly on our EC2 instances running WAS and Apache or IIS, they are only available to AWS services that have been integrated with ACM. Lucky for us ALB is one of those services.
EC2 – Elastic Cloud Computing, this is the service that allows us to create our virtual servers, known as Instances. Each instance is an individual server. There are a number of related services that are under or integrated with this service, such as the Security groups, Network Interfaces, etc.
WAS – Web Application Server, this isn’t an Amazon acronym, it is the web server software from PCSOFT that is require in order to host a WEBDEV site on a web server. It should not be confused with Web Server software, such as Apache or IIS, which is still require to actually server the dynamic webpages generated by the WAS.
VPC – Virtual Private Cloud, this is the private network created inside your AWS account. You can actually have multiple VPCs and availability zones, but that is beyond the scope of what we need and are covering today. Think of the VPC as the Server room from our past, all the servers and other services you have configured inside the VPC have the ability to access each other as they are on the same private network, however the only public access to any of those servers and services is what you define via the WAF or the Security Groups and ACLs.
RDS – Relational Database Service, in the diagram I show RDS being used to serve the database used by each EC2 Instance. RDS allows you to configure and use a database, without having to setup a server and maintain the software, etc. RDS offers PostgreSQL, MS SQL, mySQL, Oracle and several others, and is how we always setup our databases if using any of those backends in our project. However you will notice that HF SQL is not unsurprisingly not in that list. To use HF SQL in this setup, you would either install HFSQL on one of your existing EC2 Instances or create a dedicated EC2 Instance for the HF SQL server. I can’t imaging a project where we would have enough demand to require load balancing between multiple webservers and be using HF SQL as the backend, but if you are in that situation I would definitely create a dedicated EC2 instance for the HF SQL server. The projects where we us HF SQL are all smaller projects with the WAS and HF SQL installed on a single EC2 instance.
Here is a diagram showing how all these different pieces relate to each other and hopefully gives you a general understanding of how we are going to accomplish what we are going to do today.

There are a lot moving pieces and configuration involved, but once you understand the basic concepts of how it all fits together it isn’t as daunting as you might think, and of course you have Uncle Pete to pave the way and help you along the path if you get stuck 🙂
Security Groups
In the past, I have used a single generic security group that allowed public traffic from the ports need for the Web Server (80,443) as well as the ports limited to private access from the specific IPs of our development machines (RPD, HF SQL Server,etc). This becomes problematic when you start introducing WAF and ALB to the equation, and I now have broken it up into multiple security groups, we will see later how each of these are used.
PublicAccess
This allows access to ports 80 and 443 from anywhere

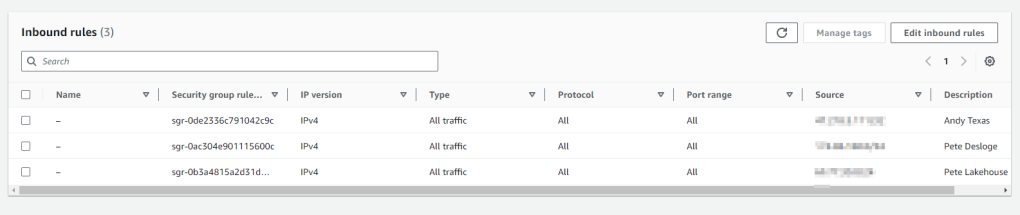
PrivateAccess
This group gives the developers access to all ports. You could limit this to specific ports and get as detailed as you desired but for our purposes we are comfortable with allow all traffic from our IPs.
AccessFromVPC
This group allows HTTP (Port 80) from anything within our VPC. The private IP range for our VPC is 172.31.0.0/16. So any server or service configured with any IP address in that range will be allowed Port 80 access via this security group
EC2 Instance
For todays example we are only going to create one instance and we won’t be going into the detail of creating that instance other than the specifics needs for this configuration. Our instance is a Windows Server with Apache and WAS installed. Normally we would configure an Elastic IP and associate it with this server but we don’t need to do that for this configuration. The only thing different that how I normally configure our EC2 Instances is:
Apache Vhost.conf
In the VirtualHost entry for this site we set the ServerName entry to the public subdomain we are using (waf.wxperts.com), and the ServerAlias entry to the private subdomain the developer will use for publishing and RDP access (waf1.wxperts.com).
<VirtualHost *:80>
    DocumentRoot "C:/Sites/WAFTest/Sites/wxDemo/WXDEMO_WEB/"
    ServerName waf.wxperts.com
    ServerAlias waf1.wxperts.com
	DirectoryIndex index.html index.awp
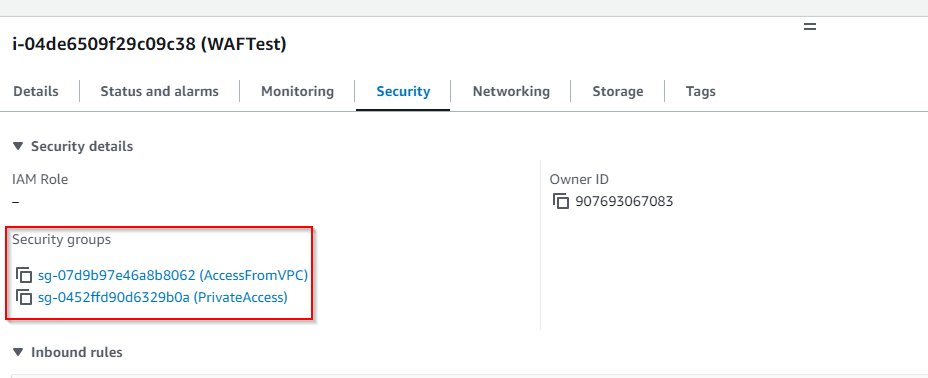
We also add two security groups to this Instance. AccessFromVPC (which will allow HTTP traffic from within our VPC) and PrivateAccess (which will allow the developers full access). Notice this means there is absolute no public access to this sever whatsoever. Other than from the developers IPs the only way to access the server is from within the VPC and then only via HTTP (port 80). As you can see this makes for a much more secure configuration even before we add the WAF.
Note: Technically this means that the web traffic to our web server is unencrypted, but that traffic is all within our VPC. If you are in an environment where you are sharing AWS resources you might need to go through additional steps to meet your security requirements. Such as adding a certificate to the web server so that traffic can be HTTPS, but remember the ACM doesn't allow the export of the private key so this means you need to use another certificate authority or a self generated certificate. You might also create multiple VPCs to separate the shared resources from each other, such as in a enterprise / departmental environment. But for our purposes this provides more than enough security.
Route 53
Route 53 is the AWS service that allows DNS configuration. We will have to revisit it a few time as we go through the steps of the configuration. We will be using two subdomains of wxperts.com for today’s example: WAF and WAF1. WAF will be the public facing subdomain that users will access.
Since we have created the ALB yet we can’t add the WAF entry but we can add the WAF1 entry. We will add this as CNAME entry point the the Public DNS name of our instance


Certificate Manager
We want our web traffic to be over HTTPS so we need a certificate. Since we are using all AWS services the easiest and FREE way to do that is via the AWS Certificate Manager. Head over there and click the request button.

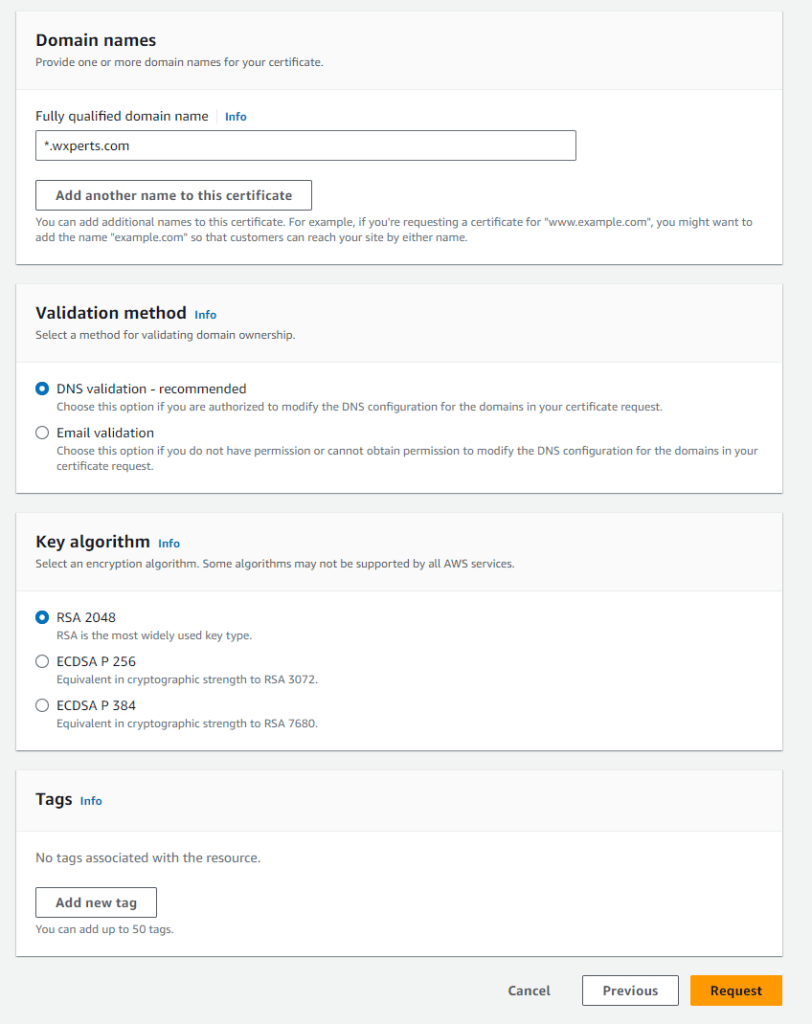
We want a public certificate

We are going to create a wildcard certificate so we can use it with any subdomain of wxperts.com, so we set the fully qualified domain name as *.wxperts.com. If desired you could enter specific subdomains and add multiple ones in this option, but I don’t know of any downside in create a wildcard certificate.
We will do DNS validation, which as you are able to see if very easy since we are using Route 53 for our DNS and we can leave the Key Algorithm as the default.
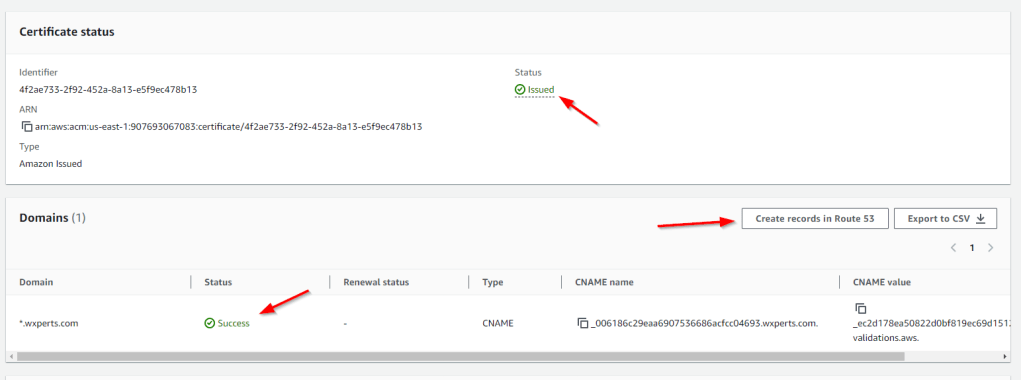
The next screen shows us a list of domain names for the certificate needing validation, and we can simple click the Create records in Route 53 button to automatically create the required CNAME entry for us. If you are using an outside service for your DNS you would need to manually create the CNAME entry in that service. Once you have create the Route 53 records it may take a few minutes to validation to take place but eventually you should get a status of Success for the validation and Issued for the certificate.
If we go back over to Route 53 we can see the CNAME record that was created

Load Balancer
Next it is time to create our Application Load Balancer, but before we can do that we need to create a target group.
Target Group
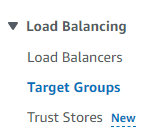
You will see the Target Group option under the Load Balancing menu in the EC2 menu
Our target Type is Instances

Name the group (WAFTest for this article). The protocol will be HTTP Port 80, remember the EC2 instance is only going to accept HTTP request from the ALB. We are only dealing with IPv4 addresses, and since we only have one VPC it is already selected and we are using HTTP1. The rest of the options are outside the scope of this article and we will just take the defaults.

After Clicking Next, we are presented with a list of our instances, we select the appropriate instance (WAFTest) and then click include in pending below. If we were going to do true load balancing we would have WAF1 and WAF2 instances here and would have selected both of them.

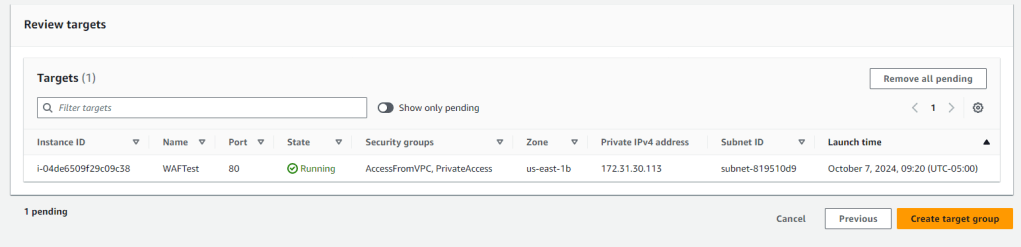
After clicking on the Include as pending below button we see a review targets section showing the targets we have added and we can click the Create Target Group button
Application Load Balancer
Now that we have a target group, we can create the ALB. Click on the Load Balancers menu option under the EC2 menu, and then on the Create Load Balancer button.

There are a few different types of load balancers, we want an Application Load Balancer, so click create in that section on the next screen

Name it, WAFTest for today’s article. It is Internet-facing, meaning it will be accessible to the outside world, and we are only using IPv4

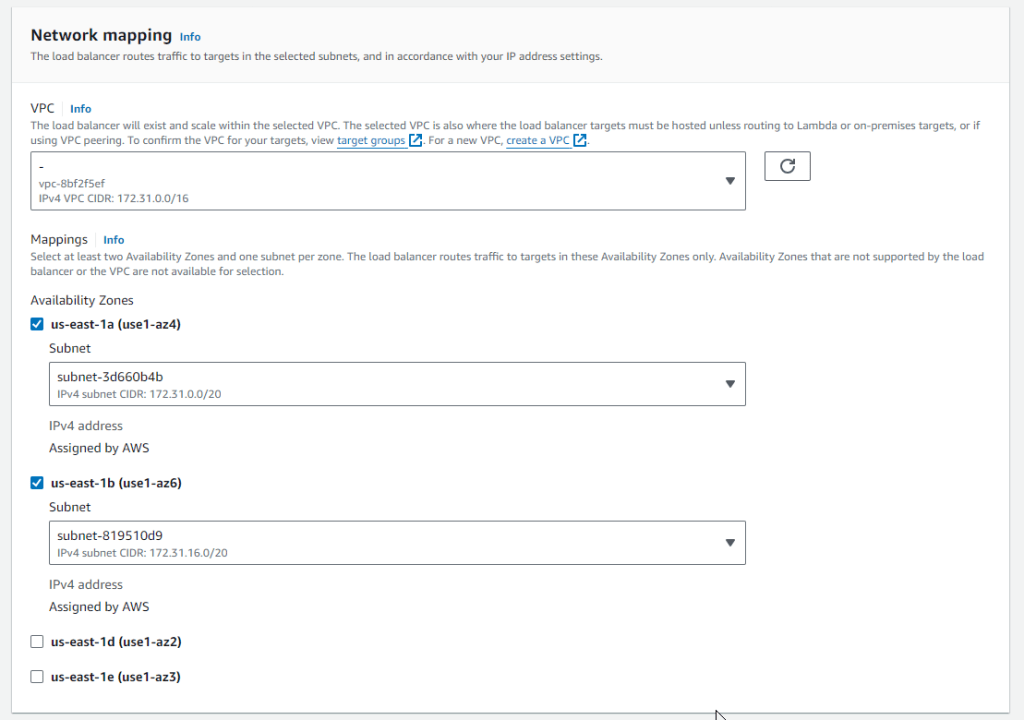
Next we need to select at least two availability zones, when you created your EC2 Instance you created it in a specific availability zone within the region you are working. This instance is in the us-east-1b availability zone. If you were doing load balancing, it would make sense to create the instances in different availability zones. We are required to select at least two, so we are going to select us-east-1b because we definitely need it, and then we can go ahead and select any of the other zones.
When you select a zone it then wants you to select a subnet, since we have created any custom subnets it selects the default subnets for us.
We remove the default Security group it adds, then add our PublicWebAccess group we created above, this will allow HTTP and HTTPS traffic from the outside world to access our ALB.

Following web best practices we don’t want to allow any public traffic via HTTP. We want all traffic to be HTTPS. So we set our default listener as HTTPS over port 443 and forward to our target group (WAFTest). We want a second listener on HTTP to redirects to HTTPS but I can’t figure out how to do that via the create interface so we will do that once the ALB is created.

We need to select the certificate we created above, so our traffic can use SSL over HTTPS. So in the Secure Listener section we choose From ACM and select the appropriate certificate. All other settings in this area can be left with the default values.

WAF
We can either create the WAF now or do it as a separate step later. It is just a few extra settings so we might as well do it now. Once we click on the checkbox to include WAF, we see a few more options, we will let it Auto-create the Web ACL for us, which includes 3 rules Amazon recommends, we will tweak this list shortly. And we want the action to be to block access based on the rules.

We can finally click the button to create the load balancer. Once it is create we will see a summary of its settings like so

As mentioned above we want to add an additional listener to redirect all HTTP traffic to HTTPS, so click Add listener. The protocol is HTTP Port 80 and we want to Redirect to URL and we want the redirect Protocol to be HTTPS 443 and the status code be 301 Permanently moved. Now any traffic that tries to use HTTP will automatically be redirected to the HTTPS equivalent.

Route 53 (Again)
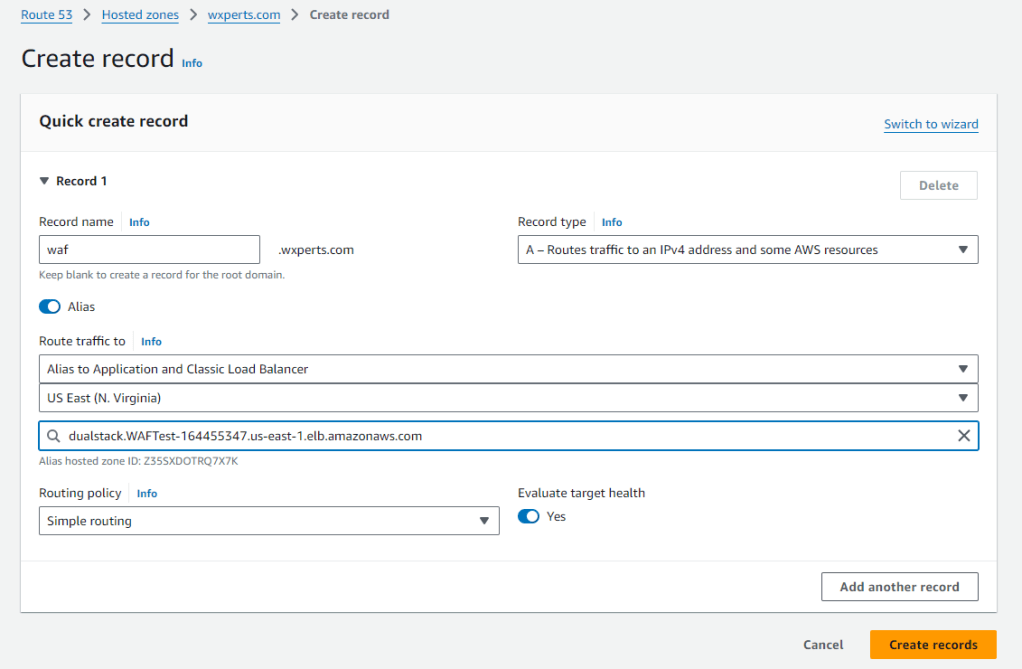
Now that we have the ALB we can add add an A record to point WAF.wxperts.com to the ALB. So head back over to Route 53, Add an A record for WAF. Turn the Alias switch on which will allow us to point the domain towards amazon services, choose Alias to Application and Classic Load Balancer, and the correct Region. Then you will be able to select the ALB we created above.

WAF (Modifications)
We already created our WAF when we create the ALB but we can add the settings to add some additional rules. For the WAF & Shield menu if we select Web ACLs we will see the WEB ACL that was automatically created with the 3 rules.

And if we click on the Web ACL we will see a summary of traffic and settings of the WAF.

There are quite literally books written on the subject of WAF configuration, so we are only going to scratch the surface in this article. For now click on the Rules Tab and we can see that the 3 rules added are: AWSManagedRulesAmazonIpReputationList, AWSManagedRulesCommonRuleSet, and AWSManagedRulesKnownBadInputsRuleSet these are some basic free rules from Amazon. We are going to add a few more, so click on Add rules, and then on the submenu select Add managed rule groups.

Then under the Free AWS manage rule groups we want to add SQL Database and Windows Operating System.

Save it and now we have our basic rule setup. As you can see there are a number of additional managed rule sets that you can add, many which include a subscription fee. At this point we have not explored any of those options. The paid rule that we will likely be exploring first is the AWS Bot control rule we does a lot of intelligent blocking of Bots. I should also note that although the rules we selected were part of the Free Managed rules, there are cost associated with WAF and ALB basic on traffic, etc. so be sure to research all the pricing and understand what your extra cost will be. In most cases for a small to midsize website it will likely add between $10 and $25 to your monthly cost depending on if you add the Bot control. You can also add you own rules based on IP sets, with a number of other conditions and get as elaborate as you desire. This is where I will be adding those IP ranges that I was doing in the ACL, with the bonus of not being limited to 40. But hopefully the Bot control will automatically handle the largest portion of those anyway. It should also be noted that so far we have only done some preliminary testing, so we may still discover addition tweaks that need to be made once we run it in production.
Publishing to the WAS and RDP Access to the EC2 Instance
Since WAF.wxperts.com points to the ALB and only allows HTTPS traffic that then gets forwarded as HTTP traffic to the EC2 instance. We need a way for developers to directly access the server for publishing and maintenance, which is why we added the PrivateAccess Security group to EC2 Instance, and pointed the WAF1 subdomain to the EC2 DNS name of the instance, so developers with RDP to WAF1 (and WAF2 etc if doing load balancing) and like wise will publish via HTTP to WAF1.wxperts.com. Since we set the ServerName to WAF and the ServerAlias to WAF1, we are able to publish to WAF1 and have the correct entries automatically added to the correct VirtualHost section, and when request via the ALB come in requestion WAF they will use that same section.
Update (10/28/2024)
In testing we have discovered two of the AWS Managed rules that need to be disabled due to the way WEBDEV submits data from forms etc.
AWSManagedRulesCommonRuleSet#SizeRestrictions_BODY
AWSManagedRulesCommonRuleSet#CrossSiteScripting_BODY

Great article! Love AWS and all the services!
LikeLike