ere’s a quick post with a few new v25 features that relate to the IDE and not actual coding and aren’t really big enough for their own post.
Feature 029: LARGE PROJECT: RIGHT CLICK “MOVE TO FOLDER”
This one doesn’t sound like much but is huge for big projects. For example, in one of our larger projects, we have the following elements

Not shown here are the 8 configurations that are also in that project. As you can imaging when your project starts getting 100’s of elements in it, finding the right element can take a bit of time. One of the ways to help organize things is Custom-Folders. From the project explorer, you simply right-click on a section (such as Windows) and select New Custom-Folder
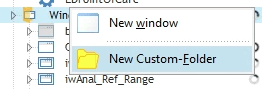
The problem comes in to play when you try to move the elements into those custom-folders. Before v25, you had to do that via drag and drop, which doesn’t sound bad until you try to do it with a list of 185 windows. The custom-folders are at the top of the windows section, to move a window from near the bottom of the list you got to drag it up but because everything doesn’t fit on the screen, you got to hit just the right spot so that the project explorer scrolls and then move your mouse back out of that area at just the right moment so you can then drop the element into the correct folder. It’s a bit hard to explain, but for anyone that has tried it I am sure they feel my pain, it feels a bit like herding cats with a mouse cursor.
v25 to the rescue! Now when you right-click on an element in the project explorer there is a Move to option, that lets you select from a list of your custom-folders. No more need to do the drag and drop dance!!!

Feature 030: WINDOW, PAGE TEMPLATE: ABILITY TO SELECT CONTROLS DIRECTLY
Before v25, when you create a template that has multiple control on it, on the individual windows that have that template it is difficult to downright impossible to select the individual controls. You have to first select the template, override the template, then select the control.
In the screenshot below you see the yellow boxes indicating that these controls come from a template, and the light outline showing all the controls in that template.

If you try to click on one of those buttons all it does is select the control template, it never selects the actual button. You can sometimes, if you hold your lips just right, get a right-click to act on the button instead of the template, but its hit or miss at best.
In v25 clicking once selects the template, however, clicking a second time selects the button.

Feature 078: ALIGNMENT ON THE ” = ” SIGN AND THE “IS” WORD
This one gave Andy and I fits for a while because the new features PDF says that the shortcut is Ctrl + Alt + =, however, it is really Ctrl + R
Back in the day when we programmed in stricter languages, lining up your code was important and some old farts (I am looking at your Andy!) still like our code to be lined up. This new feature helps with variable definitions and assignments.
For example, let’s take a look at this definition code from one of our record classes:

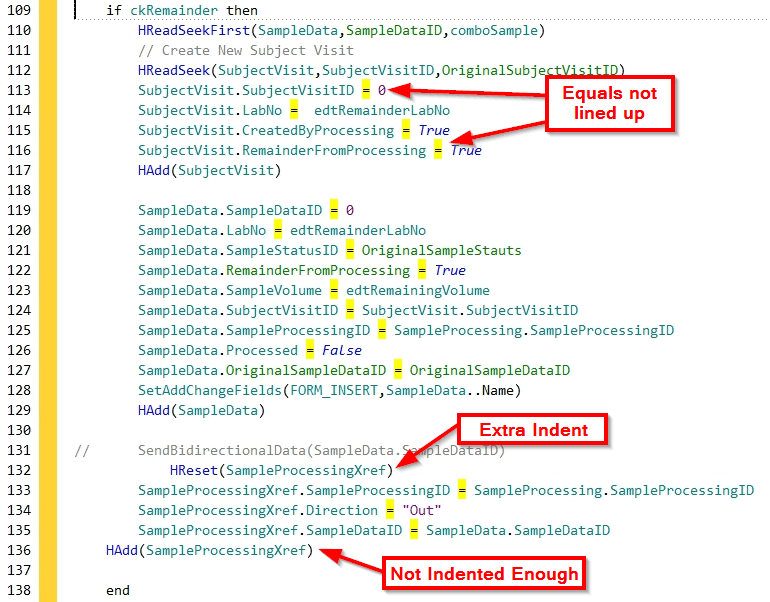
It’s a bit jumbled and hard to read. If we were really anal we might go through it and use the tab key to get it a bit tidier, but I don’t know anyone that anal 😉
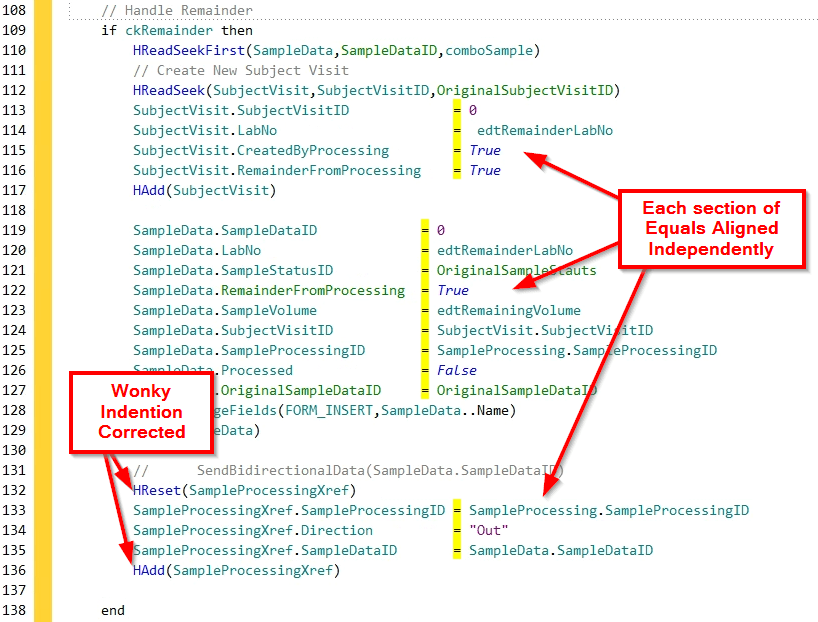
Well with v25 we can tidy that code up without all the work simply highlight the whole thing and hit Ctrl + R. BTW there is a button on the Code tab of the Ribbon bar titled Auto re-indent. that also does this and is how we finally discovered the correct hotkey! The code sure is tidier and easier to read, isn’t it!

Note this feature works for both is and =, as you can see here it lined them both up. This feature also seems to clean up other indenting as well. I purposely made the indenting of the below code haphazard.
After highlighting the entire block and pressing Ctrl + R, we get this
This feature seems to even clean up the indenting of nested statements. Take this ugly bit of code. I did this to test the code, I would never write code this ugly I promise.
 Becomes

As you can see not only is this a great feature but it appears to be even better than promised in the new features document!
Bonus Material: What does Ctrl + Alt + = do?
Remember the new feature document says the fix indent hotkey is Ctrl + Alt + = but turned out to be Ctrl + R. Well Ctrl + Alt + = already existed, I believe it came along in v23 or v24. So I figured I would mention it as well in case anyone isn’t aware of it.
Ctrl + Alt + = flips the assignment statements. Every once in awhile we have code where we need to move several variables into other variables then elsewhere in the code move them back. We don’t need to do this as often with WL Language because the control linking and FiletoScreen and ScreentoFile work so well, but we still run into the need once in a while for other needs.
Take this simple example code, as you can see we are moving realData into tmpData, then there might be some code that changes some of the values of tmpData, so before saving we need to move tmpData back into realData

When it comes time to do all of those assignments to move tmpData back into realData you have a few choices
- You could type each line as needed.
- If you do it this way, you must get paid by the hour!
- You copy the original assignment statements and paste them into the save code, then use the Alt key with the mouse selection to select all of the tmpData columns and cut them and repaste to the end of the lines behind the realData, then go through and clean up the =’s.
- It sounds like a lot of work (and it is!) but if you have been coding for 30+ years, you are probably really good at copy and paste!
- You copy the original assignment statements and paste them into the save code, then highlight them and press Ctrl + Alt + = and you are done. 3 keystrokes! You got to love that unless you get paid by the hour or keystroke, in which case see option #1 🙂
Feature 079: RETURN TO LAST CODE MODIFICATION: CTRL + ALT + BACKSPACE
This one also seems to be a different hotkey and more functional than explained in the new features PDF.
But before we talk about it lets make sure everyone knows about a feature I use constantly. If you place your mouse cursor on a procedure call and press F2, it takes you to that procedure, and Ctrl + F2 returns you back to where the procedure call was. This also works for variables, F2 takes you to where the variable is declared.
F2 same me tons of time daily, but this new feature will save even more time. Often we need to adjust logic in several areas because of some change in requirements, new data fields, etc. And there might be several places to change. A typical session might be to change some code in a window, procedure, etc. And then step through the rest of the code to make sure it will still function as expected. Well now with v25 we can quickly get back to the last code change we made, however, the hotkey is Ctrl + Alt + Left Arrow, by the way, Ctrl + Alt + Right Arrow takes us forward as well, so you can actually step back and forth through your most recent code changes. Let me tell you that sounds like a lifesaver as I don’t seem to be able to keep as much code in my head as I did when I was 20 something! There are actually button on the Code tab of the ribbon bar for this as well, titled Modification history.
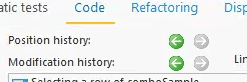
You might also notice the Position History buttons, those were there before v25, but without a caption, they just move you back and forth through each line of code that your cursor has been on, regardless of whether the code was modified or not.
Again a v25 feature that is even better than what was promised in the new features PDF!
Feature 097: KEYWORD IN LOWERCASE, OR IN UPPERCASE, UP TO YOU
One last new feature to mention in this article. You may have noticed the keywords in the code I posted above are in lowercase, and if you are used to programming in JavaScript, etc. you might even prefer it that way. BTW, if you do prefer that coding style you might also want to check out Feature 098: Curly Brackets. I won’t go into that further here because I pray no one ever uses that feature 🙂
We now can set our preferred case for keywords. And this oldtimer for one prefers Uppercase!
Let take the below code. Notice how the if, end, else, for, each are in lowercase.
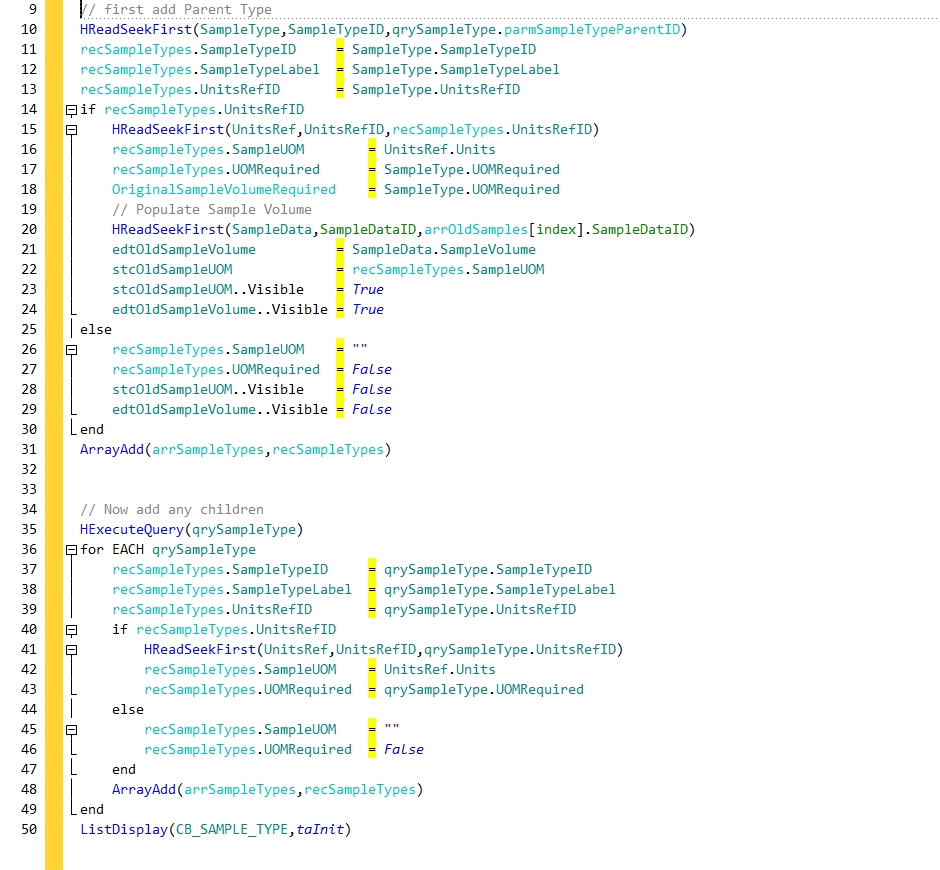
However, if we go to the Home tab of the ribbon bar and drop down the options and select Options of the code editor.
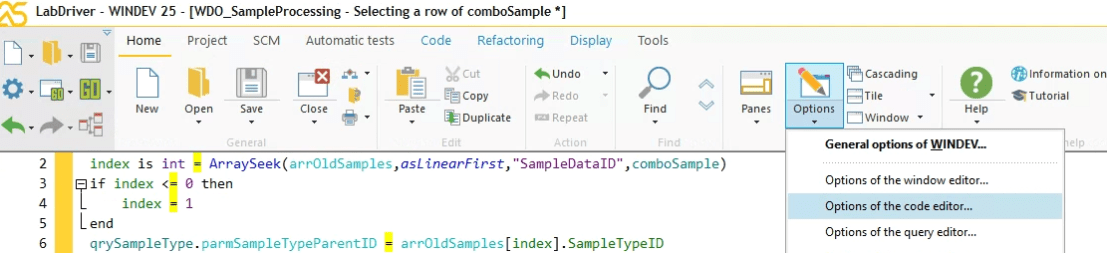
And on the Code tab, change the option, note in the screenshot the caption is Password case, but remember this is a beta release so it will hopefully be changed to Keyword case in the gold release, from Lowercase to Uppercase then our code is changed. Notice now the IF, END, ELSE, FOR, EACH are in uppercase.

Summary
We discussed 5 or 6 “little” features of v25 here, nothing earth-shattering by any means, but they all add up to an incredible amount of extra time savings, and that Ladies and Gentleman is why we can develop 10 times faster!
