
Now that we got through the some basics of the FileManager classes in the articles FileManger Primer – Adding Lookups and FileManager Primer – Simple Browse/Form, we can move on the the “good” stuff. Child management is something Andy and I worked on quite a while to perfect, and it really opens you eyes to what the FileManager classes can do for you and why we use them for all of our projects
We are using the wxDemov25 project for this series of articles, you can get the project from my dropbox or you can download it from our public SCM. Info on our public SCM can be found here. You will also need a backup of the HFSQL database which you can also get from my dropbox.
At this point we already have our simple browse and form for the Order Header, now its time to add the child browse for Order Details. Parent/Child table relationships are so common in our industry that there are books written just about the interface patterns. Yet in many programing environments you are still left with either writing a lot of low level plumbing code, or stuck with a black box that you have little to no control over.
Enabling Child management in the FileManager classes gives you a lot of power and functionality, while at the same time allowing you to tweak or change it to fit your needs. In order to do so you need to add a few things to both the Child and Parent record and manager classes. For our example the Parent is OrderHeader, and the Child is OrderDetail.
Child Record Class (OrderDetail)
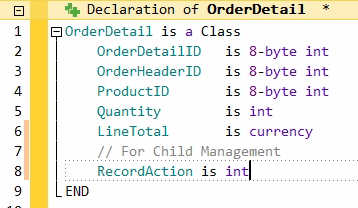
We add a new field “RecordAction” this will be used to keep track of the current state of the record (add,change,delete) while it is in memory. Note again I use a comment so I know where the “real” record definition ends.
Child Manager Class (OrderDetailManager)
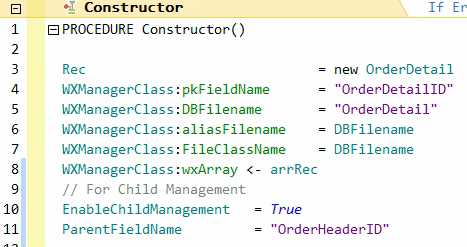
We need to lines of code added to the constructor
Line 10 Enables the Child Management logic in the wxManagerClass. And Line 11 set the name of the field, in the child table, that holds the ID of the parent record.
Pro Tip: In databases we design we always use the convention FileNameID as the autoincrementing ID primary key of the table, and then when that ID is referenced in child tables etc. we use the exact same name, that way if we do a search of the project, with the incredibly powerful IDE search function, we can quickly find everywhere the field is use from either the parent or any of the child tables.
Parent Record Class (OrderHeader)

In the declaration of the parent class we add an instance of the child class (Line 11). Note again this is below the comment denoting the end of the “real” record.

In the constructor we add the above line to turn on Memory Mode for the Child Manager class. This is where the real magic happens. While MemoryMode is turned on the SaveRecord method calls to the Manager class only happen in memory and are not saved to the database until we save the parent record.
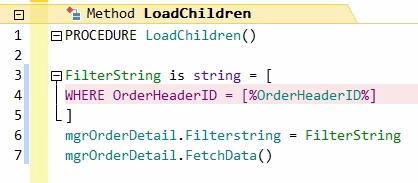
Next we create a new Method LoadChildren, that can be called to load the children of the parent record when/where needed. We create a string for the filter as it would be reusable if we have multiple children, and the WHERE clause build is quite simple.
Note the OrderHeaderID in the replacement text gets replaced by the ID for the record we are on. Remember we are in the record class so this is an instance of a single record.
Parent Manager Class (OrderHeaderManager)

We create a new method in the Parent Manager called SaveChildren. This method already exists, in the wxManagerClass as a “stub” and is called from the appropriate places to save the child records when needed.
At the point in the manager class where SaveChildren will be called rec is already populated with the parent record and what we are doing is calling a method of the child manager that forces any changes that were made while in memory mode to actually be written to the database. Remember you can always review and/or step through the wxManagerClass code in the debugger if you want to understand what it is doing better.
Note it passes the ID of the parent record to the FlushMemoryMode method, which it in turn uses along with the ParentFieldName we populated earlier to set the ParentID correct on the child records. The big advantage to all of this is the child records are managed in memory until the parent is saved, so we don’t have to do any crazy code to save an empty parent to have the id to save on child records, and in turn code to delete the orphaned children if the user ends up canceling out of a parent add, like certain other development environments which will remain nameless 🙂
Pro Tip: We need to make sure the parameters of our SaveChildren method match those of the wxManagerClass perfectly. The easiest way to do this is just copy the declaration line from the wxManagerClass
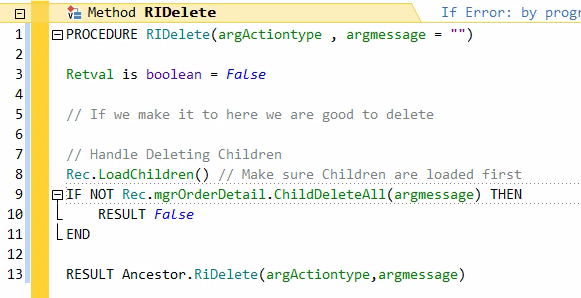
Next we need to create an RIDelete Method in the Parent Manager class. Depending on what you have been doing with your classes and project up to now, you might already have an RIDelete, if so you just need to add the relevant code to it.
RIDelete is called doing the SaveRecord “Delete” action of the manager class and has two section.
The first section, before the “If we make it here we are goo to delete” comment, gives you the opportunity to reject the delete, for example not allowing the delete of a customer record if orders records exists for the customer. To reject the delete you would just set argMessage to an appropriate message, and return a false letting the caller know that the delete failed. I will do an article showing that at some point in the future.
The second section, after the “If we make it here we are goo to delete” comment, allows us to code anything that needs to happen along with deleting the record, in this case we want to delete the children
First Line 8 makes sure the children are actually loaded in memory, depending on the coding style etc. that may or may not have happened at this point.
Line 9 calls a method in the Child Manager to delete all the records. You may be thinking, wait we didn’t create that method earlier. We don’t have to, it is already created in the wxManagerClass which the Child Manager inherits and there for has the method. If the ChildDeleteAll fails, we don’t want to delete the parent so you notice we return a false, and since we passed in argMessage it will have any message returned from the child manager. If you are wondering about why a child delete might fail, we actually have projects in production that have Great Grand Parent/Grand Parent/Parent/Child relationships and this logic steps through all of them and handles any issues.

We need to add a line of code to LoadSecondaryFields, to call the LoadChildren method that we created on the Parent Record class. More than likely you will already have a LoadSecondaryFields method on your Parent manager, but if not just add it and add the line of code.
Pro Tip: Most of the time, we code our Parent Manager like this so that anytime we have a specific Parent record loaded, we also have the children loaded, but depending on your needs, performance, etc. you may elect to not automatically load the children when loading the parent, if so then you would simply call the load children from with in your code, something similar to recOrderHeader.LoadChildren() right after the RefreshByID call.
We are all done with the class code now, all we need to do is add our controls etc. to the screens.
The Parent Form
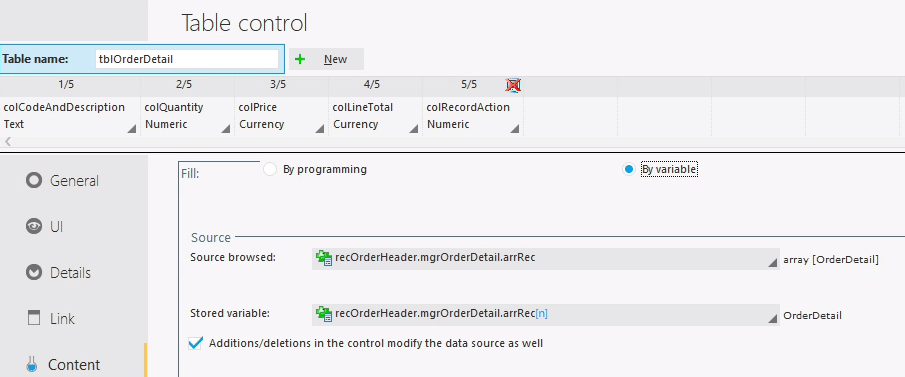
We add a table control for our detail records, notice that the source of the browse is the mgrOrdetail that we added to our OrderHeader record class earlier. This is an area that trips folks up when the first try to use the Child Management logic. They are tempted to create a manager instead for the child table, in their parent form, but you have to remember it is actually already there inside the parent record.
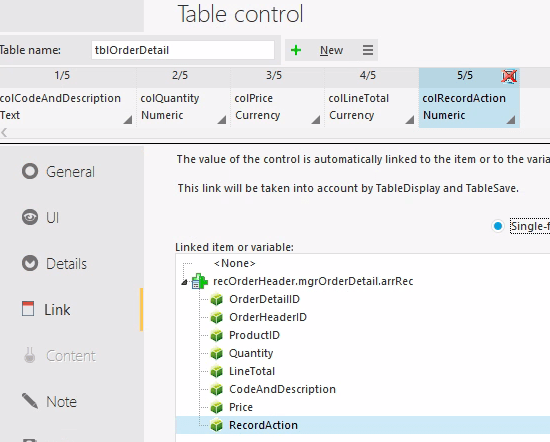
Notice that among the columns we have a hidden column called colRecordAction, this is linked to the RecordAction variable that we added to our child record class earlier.

In the Displaying a row event of our child table control, we add the above code. Which looks at the hidden colRecordAction column and highlights new and changed rows in yellow, and deleted rows as strikethrough. This provides a nice interface to the user that helps them see the changes they have made.
Pro Tip: If you download the code bricks that Andy has provided in some of his videos you will have a code brick that will create this for you.

In the closing event we use a special property of the child manager class, to see if there are any unsaved child changes and give the user a warning. This is another piece that is directly inherited from the wxManagerClass and you don’t have to do anything to create it! And yes there is a code brick for this code as well.

The Insert, Edit and Delete buttons for the child table control, have the same code as the standard CRUD buttons we did on brwOrder in the previous article FileManager Primer – Simple Browse/Form, The only differences are that the record class is our child record, we call the frmOrderDetail, and the manager uses is the one we created inside the parent record earlier. And now you see why it is so easy to create control templates for these buttons.
Notice there isn’t anything in this code about memory mode, by simply turning it on in the parent manager class, the classes know to only store the changes in memory until the parent is saved.
The Child Form
There are no difference between how you setup a child form, than a standard form as we already covered in FileManager Primer – Simple Browse/Form. Again the manager class knows to perform the saving via memory.
The Wrap-up
That’s it you have child management working, along with highlighting changes, warning users of changes they are about to abandon, etc. All with very little additional code in either the classes or your windows!
You might notice there is a bit of extra code etc. on the frmOrderDetail and the OrderDetail and Product classes relating to the Lookup of product description etc. We will cover that in an upcoming article. And if you notice that the OrderHeader total isn’t updating, don’t worry that is going to be covered in the future as well.

2 thoughts on “FileManager Primer – Child Management”