
We have a number of videos, articles, example projects, you name it covering the FileManager Classes. What I will be attempting to do with this series of blog articles is breaking down some of the features of the Filemanager Classes include bite size chunks. This is intended for folks that have already made it past the basics of creating you record and manager classes.
We are using the wxDemov25 project for this series of articles, you can get the project from my dropbox or you can download it from our public SCM. Info on our public SCM can be found here. You will also need a backup of the HFSQL database which you can also get from my dropbox.
Note: In our production project the code in this article is generally contain in some short of control template for the CRUD buttons. And of course there would be more error handling code as well as business rule logic, etc. I am trying to keep the code in this example as simple as possible so that you can see the actual code require and can decide how best to implement in into your project.
In this article we will look at the basics of a simple Browse/Form interface and the related CRUD buttons.
As you can see we have a browse with typical Insert, Edit, and Delete buttons.

And a Form with a couple of edit controls along with Save and Cancel buttons. There is space reserved for a child browse that will be coming in the next article.

Our project code already establishes a database connection and sets up the wxManagerClass. And we already have all of our Record and Manager classes defined. As well as a lookup for Customer name that was covered in this article.
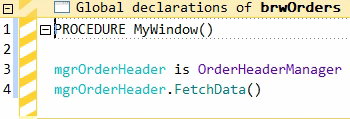
The browse is based on a Manager Class.

Note: The stored value is the entire record.
The Insert Button
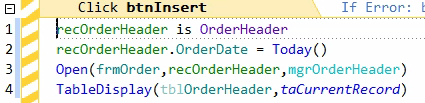
- Line 1 creates an instance of the record class
- Line 2 defaults Order Date to todays date
- Line 3 opens our form passing both the record and the manager classes.
- Remember with WL code parameters are passed by reference by default, which means any changes in those classes that happens on the form will also happen to the classes on the browse
- Line 4 refreshes the Table control, and since it is populated by the manager class and the manager class is updated on the form, the table displays the new row.
The Edit Button

- Line 1 makes sure that a record is selected
- Line 2 creates an instance of the record class and sets its value to the value of the table control
- Remember the stored value of the table control is the complete record
- Line 3 refreshes the record from the database to insure we get the latest copy incase other users have changed the record, etc.
- Line 4 opens our browse and pass the record and manager browses
- Line 5 refreshes our Table, again since the manager class was updated on the form, our record on the table reflects those changes, including the lookup field for customer name if we change it!
The Delete Button

- Again Line 1 makes sure that a record is selected
- Line 2 ask the user the proverbial “Are you sure?”
- Line 3 creates an instance of the record class and populates it with the value of the table control
- Line 4 actually performs the delete
- Line 5 refresh the table, since the record is removed from the manager class in line 4, it disappear from our table control
On to the form

- The two parameters for the record and manager class are declared
- Lines 3-5 create and populate a manager class for customer so it can be used by the combo control
- Line 6 updates all of the screen controls that are linked to the record class
The Save Button

- Line 1 moves the linked fields back to the record class
- Line 2 sees if OrderHeaderID is populated to determine if this is an Insert or Edit
- Line 3 saves the record during an edit
- Line 5 saves the record during an insert
- Line 7 closes the window returning us to the browse
The Wrap-up
That is all there is to a simple browse / form interface using the File Manager classes. Yes you could accomplish it all with very similar Hxxxx code, and in fact if you step through the class you will see that all of the methods use eventually issue that same Hxxxx command. But we all know that we don’t get paid to write simple interfaces like this example, and as you interface gets more complex that is when the FileManager classes really begin to shine, but it is important to understand the basics so you have a foundation to build on as we move further into the classes.
Be sure to stay tuned for the next article that will cover adding the child browse for order details, that is when you will really begin seeing the advantages offered by the FileManager classes.

One thought on “FileManager Primer – Simple Browse/Form”